Thanks for watching my insane automations video! In the video, I showed 10 home automations that *may* take it too far.
Well… if you’re reading this article, you must NOT think they take it too far, because this will show you how to set everything up.
In the video, I briefly showed the ideas, but couldn’t go into the details on how I set everything up. Here, you’ll find the ideas broken up into sections, so you can easily jump around to whatever home automation you want to learn how to set up.
Table of Contents
Insane home automation ideas
Affiliate Disclosure: This page has affiliate links, which earn us commission at no cost to you.
What to watch
This automation recognizes that the projector has been on too long, and has the Echo start suggesting shows from a list I’ve made. This automation seems simple on the surface but it’s actually one of the most complicated automations I’ve ever made.
I searched for many different options to store a “list” in Home Assistant. Turns out it’s less common than you might think. I ended up using their Shopping List integration even though it’s extremely flawed.
There is actually no way to access the shopping list items in Home Assistant. Wait… what! Yeah you heard that right. I have to MAKE AN API CALL TO GET ALL THE ITEMS! This is what makes Home Assistant great and terrible at the same time.
Okay here is how to make an API call to get the items. You will need to make a Sensor in your configuration.yaml file or your sensor.yaml file if you have made one of those. This will make an API call every 60 seconds and make those results available via a sensor. The sensor will be called “sensor.check_list” as you keep reading.
- platform: rest
  name: Check List
  headers:
    authorization: !secret api_token
    content-type: 'application/json'
  resource: https://YOURHOMEASSISTANTURL/api/shopping_list
  value_template: "{{ value_json | selectattr('complete', 'false') | map(attribute='name') | list | join(', ') }}"
  method: GET
  scan_interval: 60
The “!secret api_token” is just a reference to a variable called api_token in the secrets.yaml file. That should look something like.
api_token: "Bearer lasdhfjakljdhfkjadshflkasdhfklajshdfklajhfdsalkjsdhakljdshfalk" You can generate one of those in your Profile section of Home Assistant. Check out more info here about how to do it.
Okay that is just the first part! Now time to actually make the automation. I told you it was a complicated one.
The trigger for this is when my Denon receiver turns on. It has an amazing reliable integration with Home Assistant so I use it to know if my home theater has been turned on or off.
The condition is that there is actually a list of shows or movies to watch. If not, there is no reason to run this automation.
Then for the action I wait 10 minutes to give myself time to pick something to watch. After 10 minutes there is another action that checks if the XBOX is NOT playing or paused. If it is playing or paused I’ve started watching something so end the automation. It also checks if the light in the media console is turned off. This is a fail safe because if I’m playing an XBOX game it will not be in “playing” or “paused” modes. I usually leave on the accent lights until the show or game has started.
If all those conditions are true, then it will mute the Denon receiver and make a tts message to the Echo Dot in the room. That just reads the message out loud on the speaker. I’m using a template to pull that list from the sensor. Then it unmutes the speakers.
Here is the automation YAML code:
alias: Movie Suggestions
description: ''
trigger:
  - platform: device
    device_id: f438486407447a4be3ddc349a7707a
    domain: media_player
    entity_id: media_player.denon_avr_x4700h
    type: turned_on
condition:
  - condition: template
    value_template: '{{ (states(''sensor.check_list'') | length) > 0 }}'
action:
  - delay:
      hours: 0
      minutes: 10
      seconds: 0
      milliseconds: 0
  - condition: not
    conditions:
      - condition: or
        conditions:
          - condition: device
            device_id: 7eb89f5df43d68df7f9c080dab9ddb
            domain: media_player
            entity_id: media_player.theater_xbox
            type: is_playing
          - condition: device
            device_id: 7eb89f5df43d68df7f9c080dab9ddb
            domain: media_player
            entity_id: media_player.theater_xbox
            type: is_paused
      - condition: state
        entity_id: light.theater_consol_2
        state: 'off'
  - service: media_player.volume_mute
    data:
      is_volume_muted: true
    target:
      entity_id: media_player.denon_avr_x4700h
  - service: media_player.volume_set
    data:
      volume_level: 0.5
    target:
      entity_id:
        - media_player.living_room_dot
  - service: notify.alexa_media
    data:
      message: >-
        Here are some shows to watch from you list. {{
        states('sensor.check_list') }}
      data:
        type: tts
      target: media_player.living_room_dot
  - delay:
      hours: 0
      minutes: 0
      seconds: 5
      milliseconds: 0
  - service: media_player.volume_mute
    data:
      is_volume_muted: false
    target:
      entity_id: media_player.denon_avr_x4700h
mode: single
This idea uses a smart button to summon my robot vacuum to that specific room. I added the button to my bathroom drawer and when it’s pressed, the vacuum comes straight there for cleaning.
This is a much easier automation to make and you can even do it all using Alexa Routines!
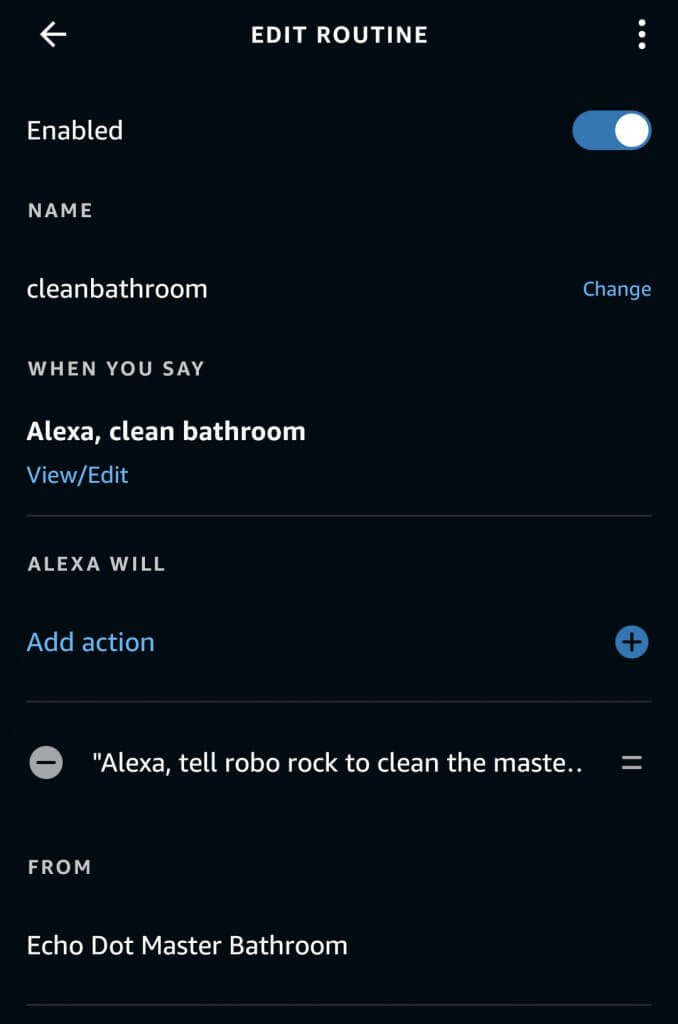
First I’m using a Roborock vacuum and it allows me to divide up the house into separate rooms. I can use Alexa to clean a specific room with the robot vacuum which is pretty sweet.
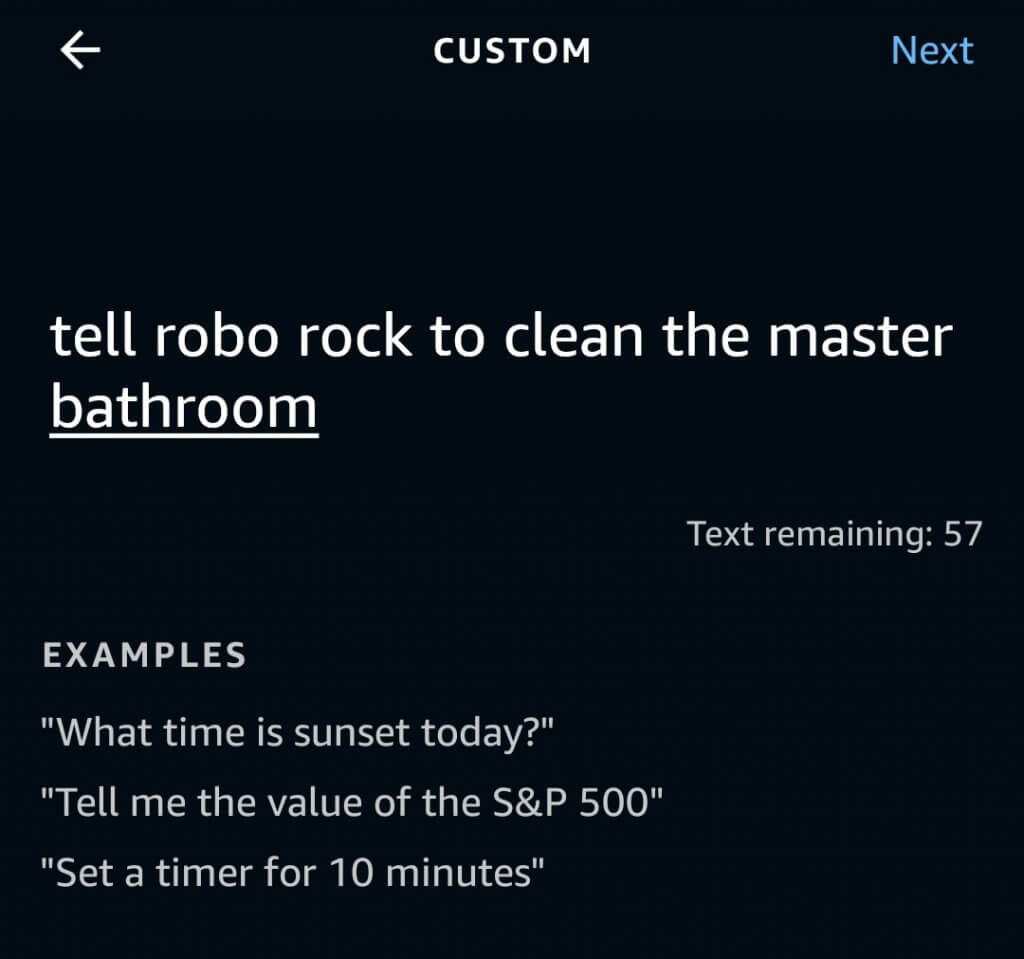
The tricky part is the voice phrase to have Alexa clean a room with the vacuum and the custom Alexa Routine action are slightly different because Roborock can’t be one word. Here is what worked for me. “tell robo rock to clean the master bathroom”. Because I named the room “master bathroom” in the Roborock app.
There are buttons like this Broadlink button to trigger an Alexa Routine and you could do it like that and you would be all done.
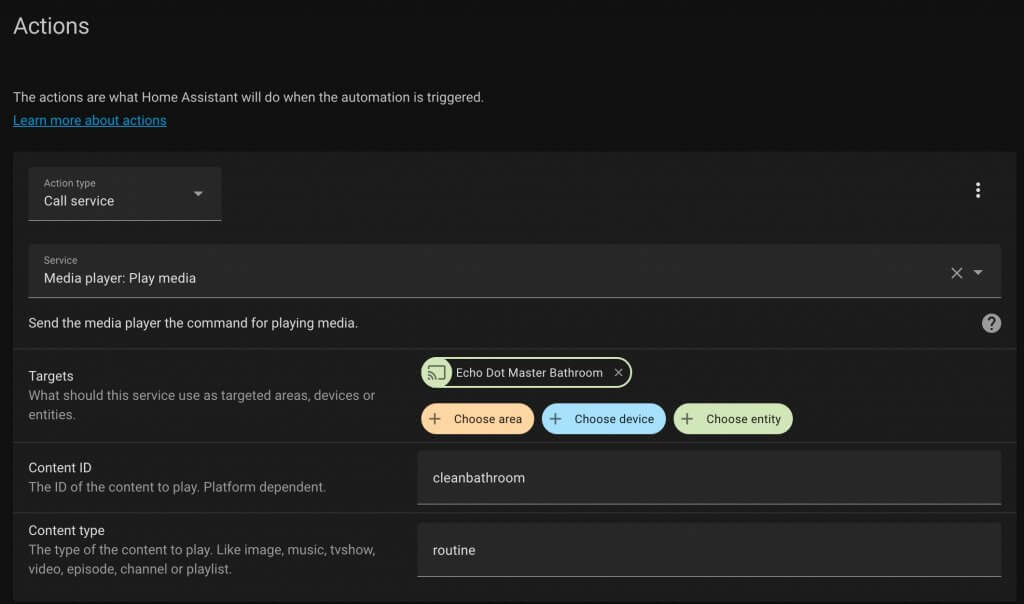
I’m actually using an Aqara Zigbee button connected to Home Assistant that calls the Alexa Routine. I’m using Alexa Media Player and this is what the automation looks like.

Scare kids back to bed
This idea is probably a little questionable since my wife gave it the axe it right away. I was thinking when our young kids get out of bed, an Echo Flex speaker in the hallway could gently “scare” them back into their room by saying certain phrases.
REMOVED DUE TO SPOUSE VETO
Smart tracker
We always forget when we’ve given the kids vitamins, so I made a smart tracker. Press the button and it will tell you if they have already had vitamins for the day. If not, then it notes that you’ve now given them to the kids. Then if it’s pressed again, it will tell you they already had their vitamins for the day.
The easiest way that I could think of was to create a virtual boolean on/off switch and turn it on when the vitamin button was pressed.
But first the automation checks to see if the virtual boolean is on or off. If it is off, it will read a message on the Echo Show in the kitchen saying it’s okay to give them their vitamins. After that, it changes the boolean to on.
Then there is another automation that runs every night which resets the boolean to “off” as well as all my other temporary booleans I use for automations. Here is the automation YAML code.
alias: Kid Vitamin Button Pressed
description: ''
trigger:
  - device_id: cf813fdb93b33da251e2937c26e54e
    domain: zha
    platform: device
    type: remote_button_short_press
    subtype: turn_on
condition: []
action:
  - service: media_player.volume_set
    data:
      volume_level: 0.6
    target:
      entity_id:
        - media_player.reed_s_2nd_echo_show
  - choose:
      - conditions:
          - condition: state
            entity_id: input_boolean.kid_vitamins
            state: 'off'
        sequence:
          - service: notify.alexa_media
            data:
              message: >-
                Yes, give the kids their vitamins and I have marked down that
                they have had them.
              data:
                type: tts
              target: media_player.reed_s_2nd_echo_show
          - service: input_boolean.turn_on
            data: {}
            target:
              entity_id: input_boolean.kid_vitamins
    default:
      - service: notify.alexa_media
        data:
          message: STOP! They have already had their vitamins for the day.
          data:
            type: tts
          target: media_player.reed_s_2nd_echo_show
mode: single
Also the bonus automation to remind us that the kids haven’t had their vitamins yet at dinner time:
alias: Kid Vitamin Reminder
description: ''
trigger:
  - platform: time
    at: '17:10:00'
condition:
  - condition: state
    entity_id: input_boolean.kid_vitamins
    state: 'off'
action:
  - service: media_player.volume_set
    data:
      volume_level: 0.6
    target:
      entity_id:
        - media_player.reed_s_2nd_echo_show
  - service: notify.alexa_media
    data:
      message: >-
        This is a friendly reminder that the kids have not had their vitamins
        today.
      data:
        type: tts
      target: media_player.reed_s_2nd_echo_show
mode: single
Hidden NFC tag
To trigger advanced scenes and automations with my light switch, I hid some NFC tags behind the switch plate. Of course I could use a smart switch for this, but this is a more affordable, fun, and sneaky way to automate.
Here are the NFC stickers I used. If you don’t have plastic light switch covers then this might not work.
Adding NFC tags into Home Assistant is extremely easy. Go to Configuration and then select Tags. Click on the “ADD TAGS” button. After giving it a name scan the NFC tag and you are good to go.
Then when creating an Automation you can select Tag as the trigger and select which NFC tag you want to trigger the automation.

Help with groceries
If I’m already home and my wife just arrives home, plus the garage door is open for longer than a minute, I get an alert to help bring in the groceries. This way I can make sure I’m helping out even if I’m on the other side of the house and don’t realize she just got home.
The automation isn’t long, but has some interesting conditions that might be hard to grasp at first. The Automation trigger is simple: if the garage door has been left open for 2 minutes.
For the conditions, if my wife Aly is gone for more than 5 minutes and I’ve been home for more than 5 minutes, then it’s okay to run this automation.
The action is a script I wrote that sends my phone a push notification. That way if I ever switch phones I only have to change the push notification action in one spot and not in all my automations. Major time saver!
alias: Grocery Help Notification
description: ''
trigger:
  - platform: device
    device_id: fa283f0c63a7e7874d6072793d5197
    domain: cover
    entity_id: cover.garage_door_main
    type: opened
    for:
      hours: 0
      minutes: 2
      seconds: 0
condition:
  - condition: not
    conditions:
      - condition: state
        entity_id: device_tracker.alys_iphone_se
        state: home
        for:
          hours: 0
          minutes: 5
          seconds: 0
  - condition: state
    entity_id: device_tracker.pixel_6a
    state: home
    for:
      hours: 0
      minutes: 5
      seconds: 0
action:
  - service: script.android_notification_basic
    data:
      title: Aly is home with groceries
      message: Get up and help her!
mode: single
Dynamic alarm
I wanted an automation that shifts my alarm clock depending on how late I stayed up the night before. Now, the pressure sensor under my bed can shift my alarm clock up if I crash early, or move it back if I stay up.
I’m using a Withings sleep sensor under my mattress and this thing has been so useful. It can integrate with Home Assistant and also works with IFTTT.
The automation is pretty simple. I turn on a virtual boolean on/off switch if I get in bed early and stay in bed for over 20 minutes. That way if I sit on my bed it doesn’t activate early wake up.
alias: Reed Sleep Early On
description: ''
trigger:
  - platform: state
    entity_id: binary_sensor.withings_in_bed_reed
    to: 'on'
    for:
      hours: 0
      minutes: 20
      seconds: 0
condition:
  - condition: time
    before: '23:00:00'
    after: '20:00:00'
action:
  - service: input_boolean.turn_on
    data: {}
    target:
      entity_id: input_boolean.going_to_sleep_early
mode: single
Then I have another automation that will wake me up early if this boolean is turned on. It’s very similar to the automation that runs at 7:30, but it looks for that condition for that boolean to be on.
Also the normal 7:30 automation alarm is automatically skipped if I am not in bed anymore, so I don’t ever have to disable it.
alias: Morning Shades Up Early
description: ''
trigger:
  - platform: time
    at: '06:30:00'
condition:
  - condition: state
    entity_id: input_boolean.morning_wakeup
    state: 'on'
  - condition: state
    entity_id: binary_sensor.withings_in_bed_reed
    state: 'on'
  - condition: state
    entity_id: input_boolean.going_to_sleep_early
    state: 'on'
action:
  - device_id: fffc7ba04a6ed8ce1455f4a9c6aeaa
    domain: cover
    entity_id: cover.master_bedroom_left_shade
    type: set_position
    position: 100
  - device_id: 8bfe44290e2fae4ad1a826c7f0cc9d
    domain: cover
    entity_id: cover.master_bedroom_right_shade
    type: set_position
    position: 100
  - service: media_player.play_media
    data:
      media_content_type: routine
      media_content_id: morningmusic
    target:
      entity_id:
        - media_player.blue_dot
mode: single
Extra wake up motivation!
If the pressure sensor notices I’m still in bed and needing some extra motivation to wake up, it will have my Echo announce to my kids that it’s time to wake up dad.
If you want your Alexa to say random phrases, then this is the little bit of code you can add to your Home Assistant automation to do that.
service: notify.alexa_media
data:
  message: >-
    {% set insult_list = ("seriously get out of bed, you are such a
    disapointment","if I had a dollar for every hour you wasted I would be
    richer than Jeff Bezos") %}
    {% set insult_list_random = (insult_list | random) %}
    Thats it, {{ insult_list_random }}
  data:
    type: tts
  target: media_player.kleinman_s_echo_dot
It’s a template that makes a list of strings or phrases. This example only has 2 for simplicity but then it picks a random phrase using this line {% set insult_list_random = (insult_list | random) %}
I’m going to have too much fun with this functionality!
The rest of the automation is pretty much a combination of the pressure sensor from Withings and making Alexa speak to get the kids to jump on me if I’m still in bed. Yes this automation got triggered just this morning and the kids jumped on me. It works!
NFC music tag
Whenever I scan this NFC tag, it starts playing music on my Echo and pulls up my custom music dashboard. This makes it way easier to control the music on my phone while it plays on the Echo!
Here is the automation when the NFC tag is scanned.
alias: Studio NFC Echo Scanned
description: ''
trigger:
  - platform: tag
    tag_id: 537fb3d3-9b1c-456c-b632-855cddd024db
condition: []
action:
  - service: script.actionable_android_music_notification
    data: {}
  - service: script.spotify_source_studio
    data: {}
  - service: media_player.media_play
    data: {}
    target:
      entity_id: media_player.spotify_kleinman_family
mode: single
It calls an actionable notification that when pressed will open up the Music view on my Home Assistant dashboard. If anyone knows of a better way to scan an NFC tag and open a specific view of Home Assistant then let me know!
alias: Actionable Android Music Notification
sequence:
  - service: notify.mobile_app_pixel_6a
    data:
      title: NFC Tag Scanned
      message: Open Music Tab?
      data:
        clickAction: /lovelace-dash/music
        url: /lovelace-dash/music
mode: single
Hit me baby one more time!
Adding a vibration sensor under my media cabinet, I automated it to turn on the theater room whenever it detects vibration. So now a simple hit can turn on a show. I love it!
I’m using an Aqara vibration sensor connected to Home Assistant using the ZigBee/Z-Wave stick.
The only thing I wanted to make sure didn’t happen was triggering this automation from the subwoofer during a movie. So this only works if the theater is already off.
alias: Theater Room Start with Hit
description: ''
trigger:
  - type: vibration
    platform: device
    device_id: 347389a5390cc16e21824fc229de13fc
    entity_id: binary_sensor.lumi_lumi_vibration_aq1_ias_zone
    domain: binary_sensor
condition:
  - condition: device
    device_id: f438486407447a4be3ddc349a7707ab7
    domain: media_player
    entity_id: media_player.denon_avr_x4700h
    type: is_off
action:
  - service: script.alexa_routine_movie_preview
    data: {}
mode: single
The script that gets called turns on the projector, amp, lights, and calls an Alexa Routine to turn on some devices only connected with Alexa.
alias: Alexa Routine Movie Preview
sequence:
  - service: media_player.play_media
    data:
      media_content_type: routine
      media_content_id: premovie
    target:
      entity_id: media_player.reed_s_echo
  - service: switch.turn_on
    target:
      entity_id: switch.projector_power
    data: {}
  - service: media_player.turn_on
    data: {}
    target:
      entity_id:
        - media_player.denon_avr_x4700h
        - media_player.theater_xbox
  - type: turn_on
    device_id: b3709ca6411ef9b6a1fcecc7d26a82df
    entity_id: light.theater_floor_2
    domain: light
    brightness_pct: 100
  - service: light.turn_on
    target:
      entity_id: light.lines_25d7
    data: {}
mode: single
Thanks so much for all of your support! If you like these automation ideas, make sure you subscribe to my YouTube channel so you don’t miss future videos.