If you just watched the video, thanks for supporting the channel! Here is a link to the video if you haven’t seen it.
This article will go over all of the granular details on setting up these automations. I will be mainly using Home Assistant, but most of these can be done on other hubs like SmartThings.
Table of Contents
Smart Shades
For this automation I have the IKEA FYRTUR shades that are connected directly with SmartThings using Zigbee. I then have SmartThings connected to Home Assistant and they integrate very well together.
I’m also using the remote button that comes with the FYRTUR shades connected to SmartThings using Zigbee again. For the motion sensor I’m using a Hue motion sensor, but most motion sensors will work well.
The trigger for the automation is simple. When the motion sensor detects motion, start the automation. However, there are 4 conditions that help this automation run when it’s supposed to.
It only runs from 10 am to 4:30 pm. Any earlier, the sun will shine through and I didn’t want this running in the evening.
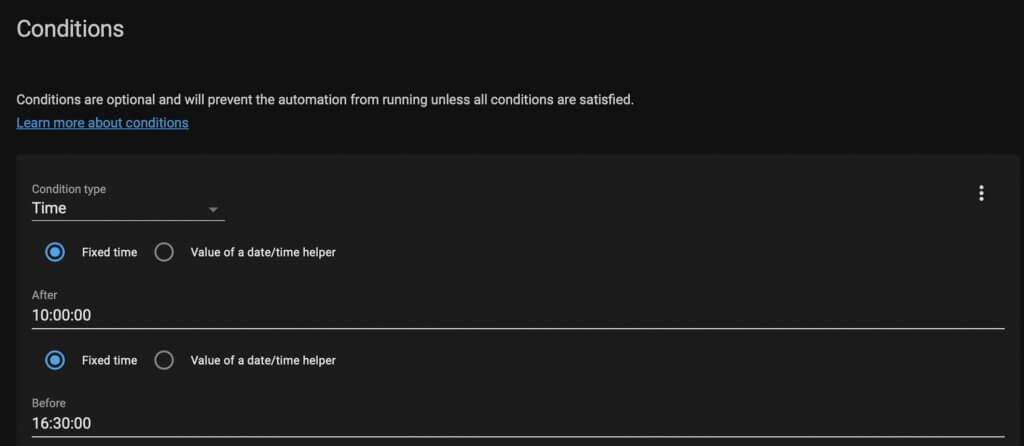
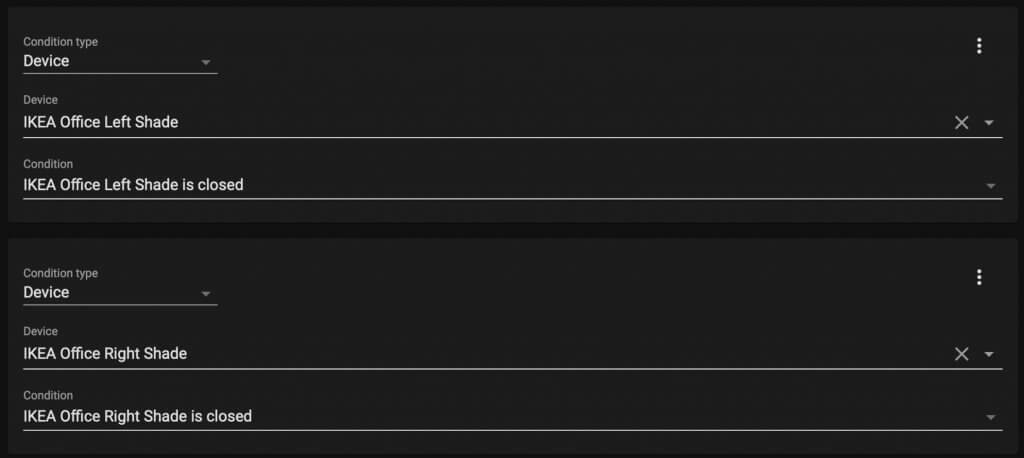
It also only runs if the shades are both closed.
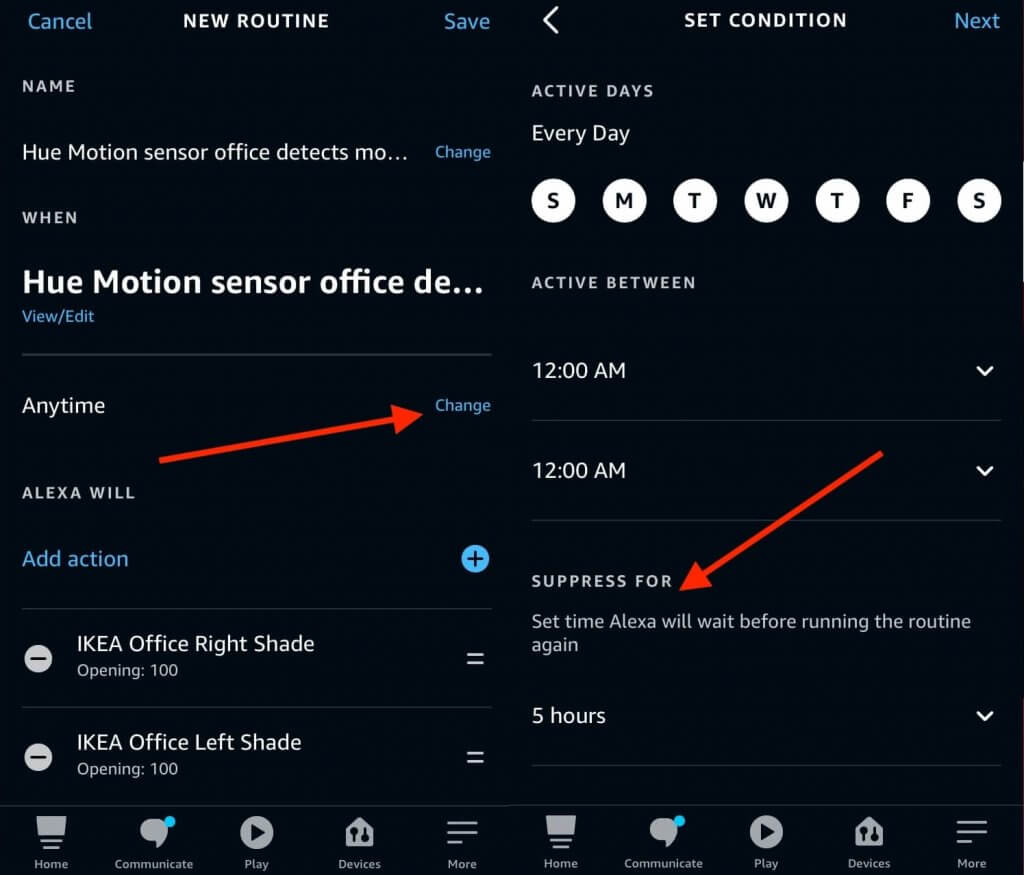
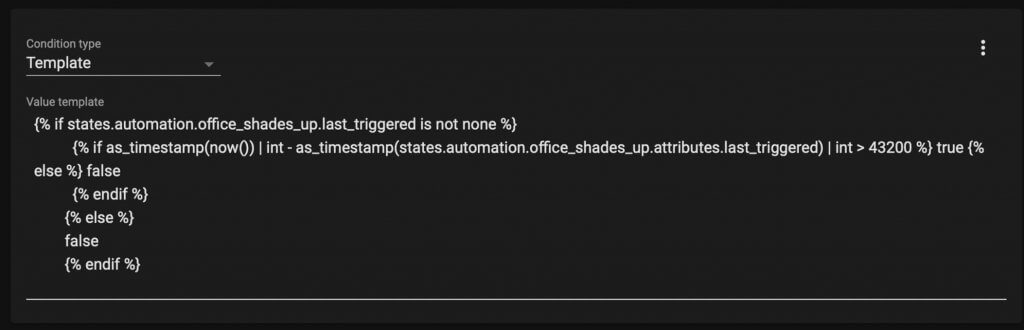
Then it checks to see if the automation has run in the last 12 hours (or 43,200 seconds). That way if I manually close the shades they don’t open back up on that day.
With Alexa Routines you would do this. Select “Anytime” and then “SUPPRESS FOR”.
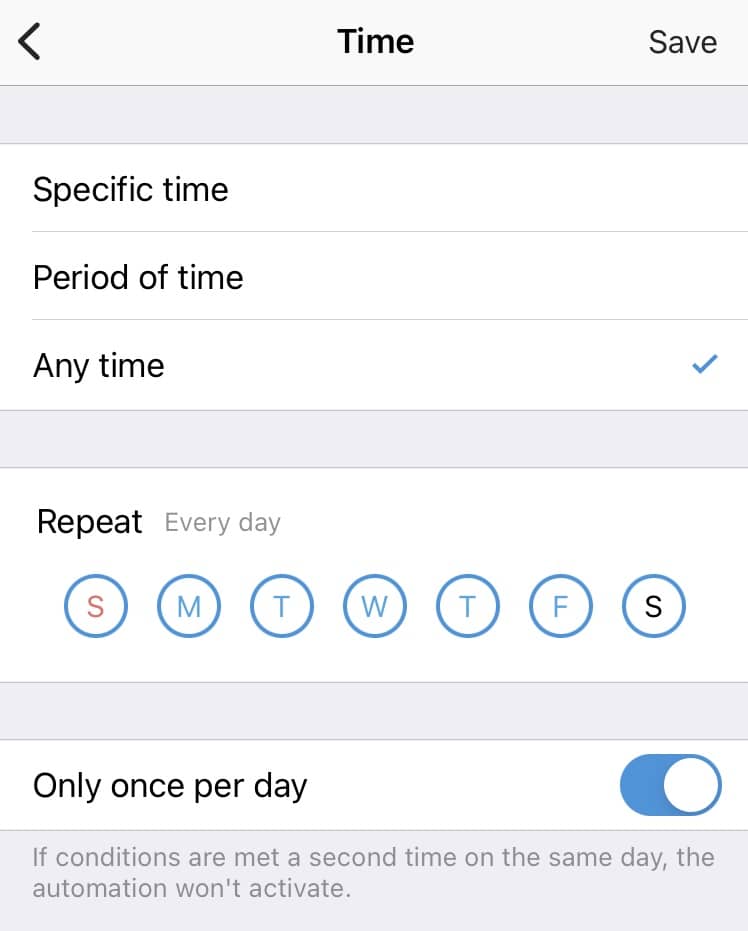
SmartThings you would select Time as a condition and change it to once per day.
To do it in Home Assistant it’s much more difficult. You have to create a template for the condition. Just swap out “office_shades_up” for your automation name and you can change the time 43200 for how many seconds you want it to be.
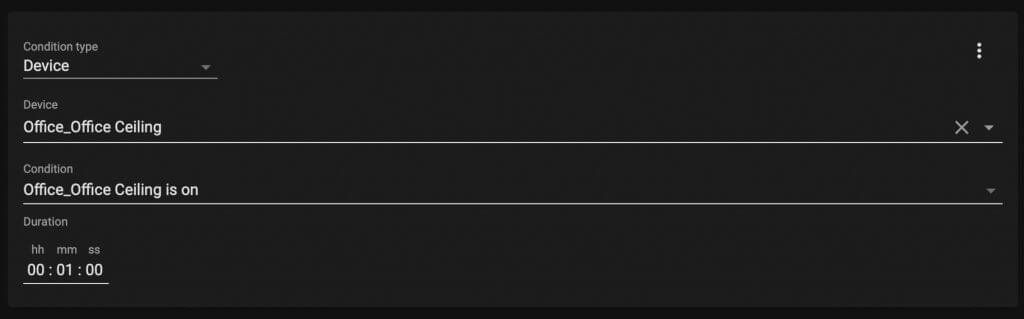
Lastly I also check if the ceiling lights have been on for at least 1 minute.
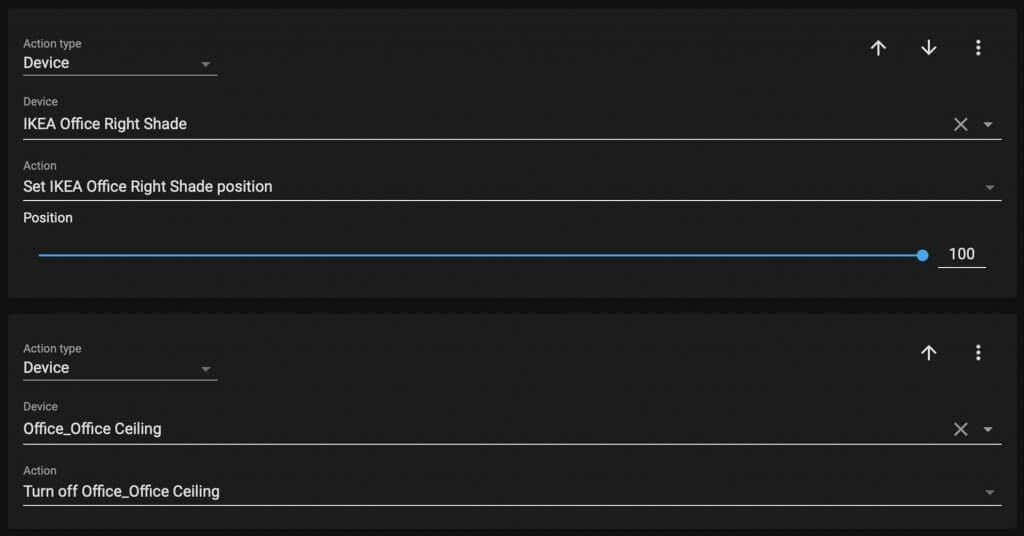
Then the shades open up and the lights turn off.
I also have the shades close every day if they are open in the evening. Here is the YAML code if you’re using Home Assistant.
alias: Office Shades Up
description: ''
trigger:
  - type: motion
    platform: device
    device_id: abcdefghijklmnopqrstuvwxyz
    entity_id: binary_sensor.hue_motion_sensor_motion
    domain: binary_sensor
condition:
  - condition: time
    after: '10:00:00'
    before: '16:30:00'
  - condition: device
    device_id: abcdefghijklmnopqrstuvwxyz
    domain: cover
    entity_id: cover.ikea_office_left_shade
    type: is_closed
  - condition: device
    device_id: abcdefghijklmnopqrstuvwxyz
    domain: cover
    entity_id: cover.ikea_office_right_shade
    type: is_closed
  - condition: template
    value_template: |
      {% if states.automation.office_shades_up.last_triggered is not none %}
                {% if as_timestamp(now()) | int - as_timestamp(states.automation.office_shades_up.attributes.last_triggered) | int > 43200 %} true {% else %} false
                {% endif %}
              {% else %}
              false
              {% endif %}
  - condition: device
    type: is_on
    device_id: abcdefghijklmnopqrstuvwxyz
    entity_id: light.office_office_ceiling
    domain: light
    for:
      hours: 0
      minutes: 1
      seconds: 0
      milliseconds: 0
action:
  - device_id: abcdefghijklmnopqrstuvwxyz
    domain: cover
    entity_id: cover.ikea_office_left_shade
    type: set_position
    position: 100
  - device_id: abcdefghijklmnopqrstuvwxyz
    domain: cover
    entity_id: cover.ikea_office_right_shade
    type: set_position
    position: 100
  - type: turn_off
    device_id: abcdefghijklmnopqrstuvwxyz
    entity_id: light.office_office_ceiling
    domain: light
mode: single
Doorbell Motion
For this automation I am using the Unifi G4 doorbell. You need a lot more to get up and running with this doorbell over others like Ring and Nest Hello, but I’ll be comparing them in a video soon. I connected the G4 doorbell to Home Assistant using this GitHub repository. I installed it using HACS.
I have a contact sensor on my front door. I’m using a Ring sensor, which I couldn’t get working with Home Assistant. It looks like others did over a year ago but I did a workaround that I’m not really proud of, but it does work. I have the Ring contact sensors change a SmartThings virtual switch that goes into Home Assistant. I know there are sensors that I wouldn’t have to do this for, but I didn’t want to clutter my front door with sensors. It works surprisingly well though.
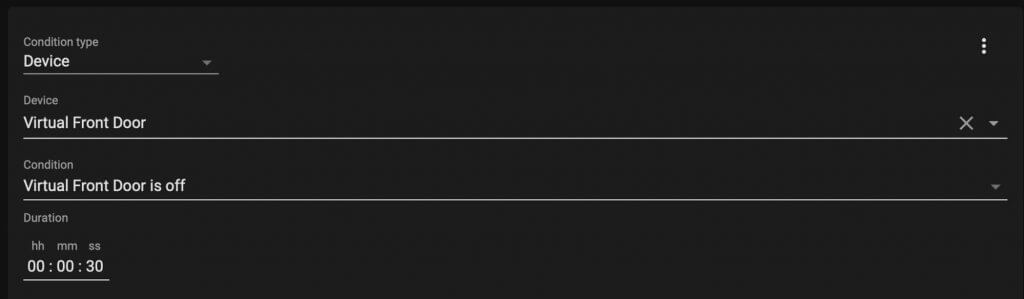
The trigger for the automation is if there is motion, but the first condition is if the door is closed for 30 seconds. Since mine is a virtual switch, if it’s been off for 30 seconds.
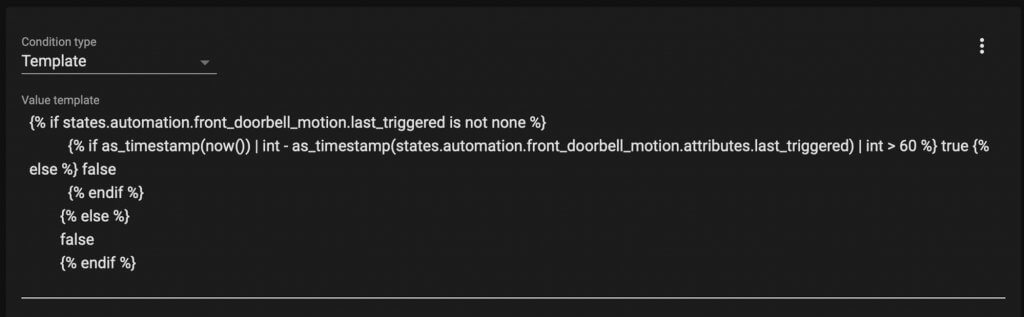
Then the next condition is to limit how often I get notifications. I have mine set to 60 seconds. This is the exact same thing that was mentioned in the previous automation, if you’re using another system besides Home Assistant.
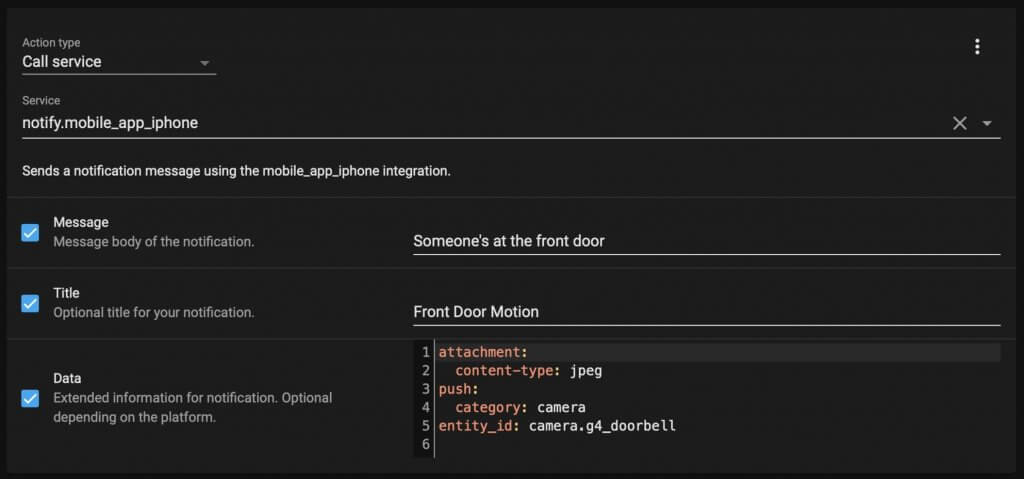
Then here is the notification that shows the image preview as well.
alias: Front Doorbell Motion
description: ''
trigger:
  - type: motion
    platform: device
    device_id: abcdefghijklmnopqrstuvwxyz
    entity_id: binary_sensor.motion_g4_doorbell
    domain: binary_sensor
condition:
  - condition: device
    type: is_off
    device_id: abcdefghijklmnopqrstuvwxyz
    entity_id: switch.virtual_front_door
    domain: switch
    for:
      hours: 0
      minutes: 0
      seconds: 30
      milliseconds: 0
  - condition: template
    value_template: >
      {% if states.automation.front_doorbell_motion.last_triggered is not none
      %}
                {% if as_timestamp(now()) | int - as_timestamp(states.automation.front_doorbell_motion.attributes.last_triggered) | int > 60 %} true {% else %} false
                {% endif %}
              {% else %}
              false
              {% endif %}
action:
  - service: notify.mobile_app_iphone
    data:
      message: Someone's at the front door
      title: Front Door Motion
      data:
        attachment:
          content-type: jpeg
        push:
          category: camera
        entity_id: camera.g4_doorbell
mode: single
Doorbell Chime Silence
For this automation, I turned off the chime in the settings of the G4 doorbell. In the Protect app on the desktop, click on your Doorbell device -> Manage -> Chime and turn it off.
Then I’m using Home Assistant to trigger an Alexa Routine to announce someone is at the door. I used HACS again and this time installed Alexa Media Player. There’s so much you can do with the Alexa Media Player. For this I’m using it to to call an Alexa Routine.
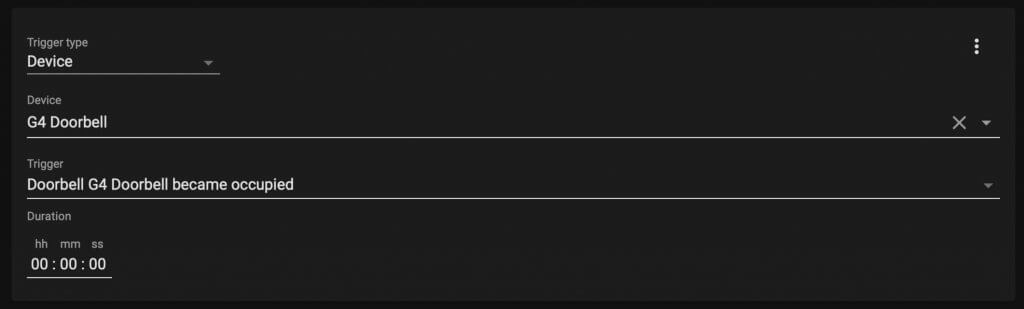
The automation trigger is when the doorbell is pressed. For some reason it’s called “became occupied”.
Then I created a Script in Home Assistant to call the Alexa Routine.
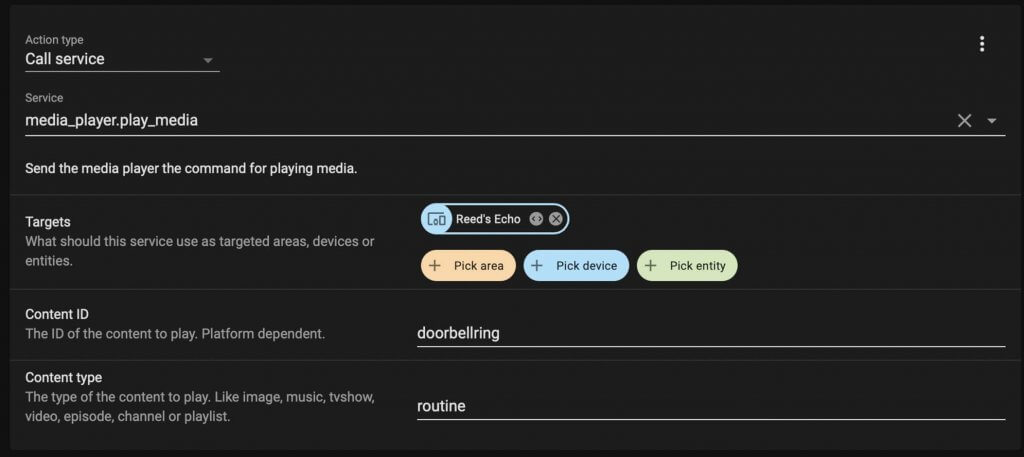
In the Actions of the automation I call that script I just created and also notify my phone with a preview of the doorbell camera as well.
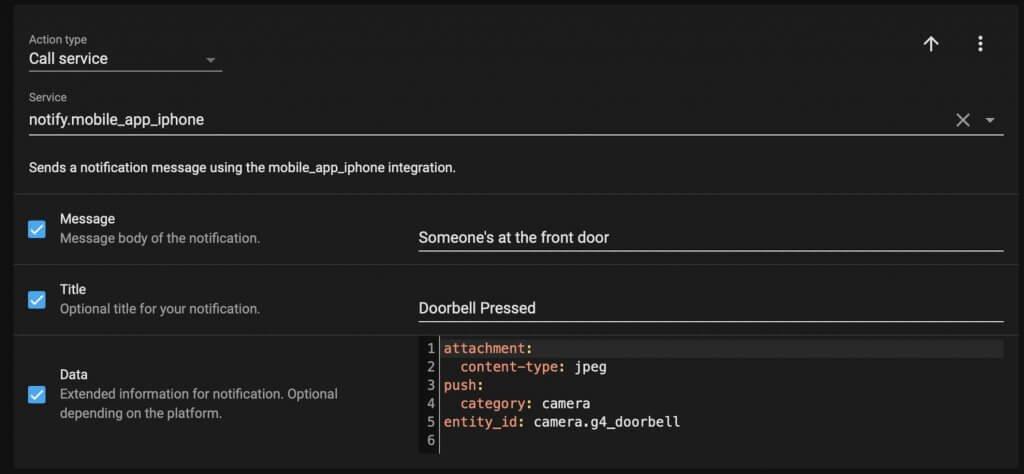
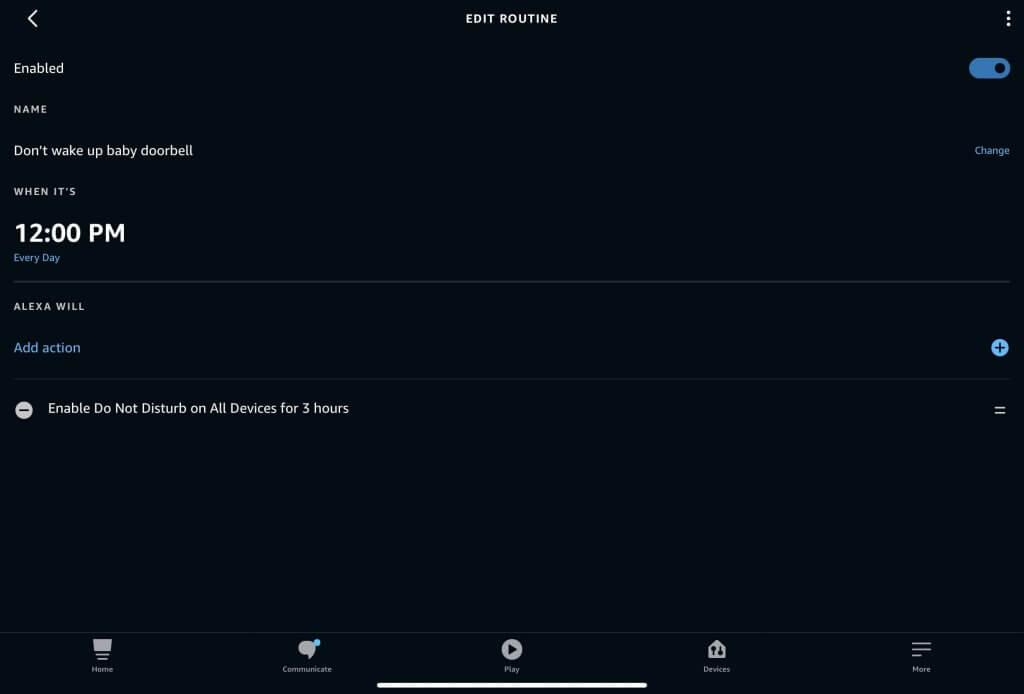
I also created an Alexa routine to run every day and makes all the echo devices go into do not disturb mode for 3 hours.
alias: Front Doorbell Pressed
description: ''
trigger:
  - type: occupied
    platform: device
    device_id: abcdefghijklmnopqrstuvwxyz
    entity_id: binary_sensor.doorbell_g4_doorbell
    domain: binary_sensor
condition:
  - condition: time
    after: '07:00:00'
    before: '21:00:00'
action:
  - service: script.alexa_routine_motion_front_door
  - service: notify.mobile_app_iphone
    data:
      message: Someone's at the front door
      data:
        attachment:
          content-type: jpeg
        push:
          category: camera
        entity_id: camera.g4_doorbell
      title: Doorbell Pressed
mode: single
Laundry Room Vent
To turn on the laundry room fan vent when the washer or dryer was going, I needed a few things. One is a smart switch to turn the fan on and off. I’m using this one from Zooz, but most smart on/off switches will work.
I’m also using this integration for my LG ThinQ washer and dryer. I installed it using HACS and it works pretty well. If you don’t have a smart washer or dryer there are a few things you can do.
I showed how to use a smart outlet to know if your washing machine is running. There’s also a cool device called SmartDry you can put in your dryer to run automations as well.
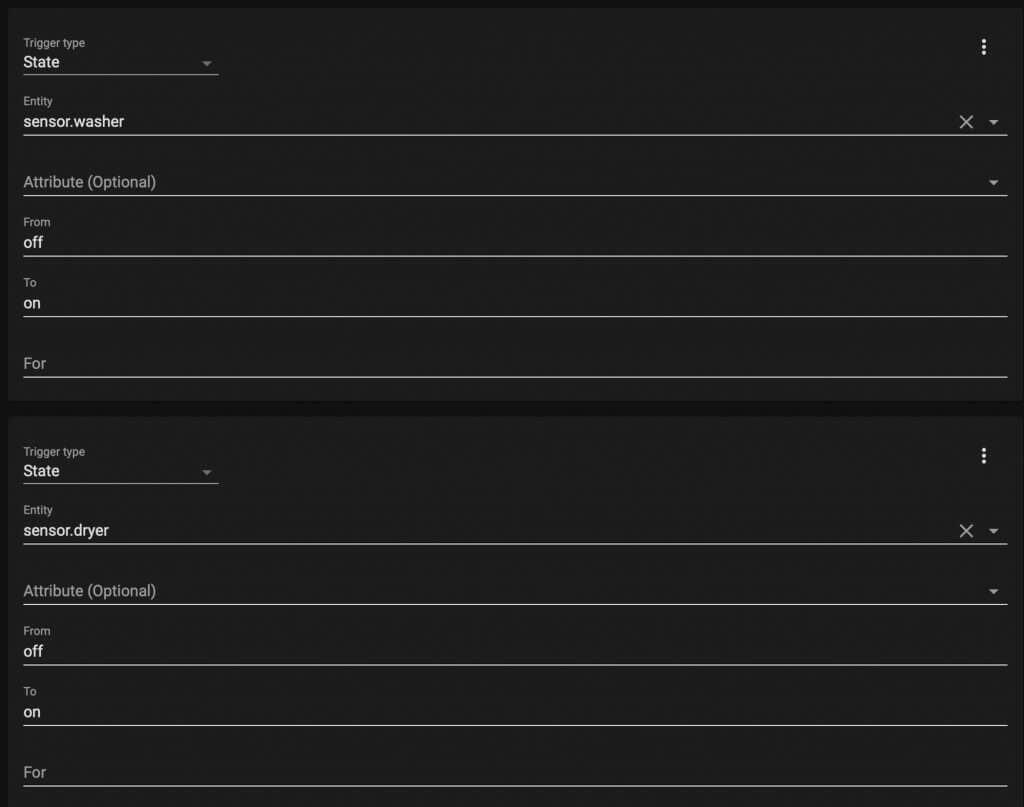
In Home Assistant I’m using the washer/dryer sensor state as the trigger. Either one will turn on the smart switch.
Then I created two more automations. One turns on the switch if the switch was turned off while the washing machine or dryer are running.
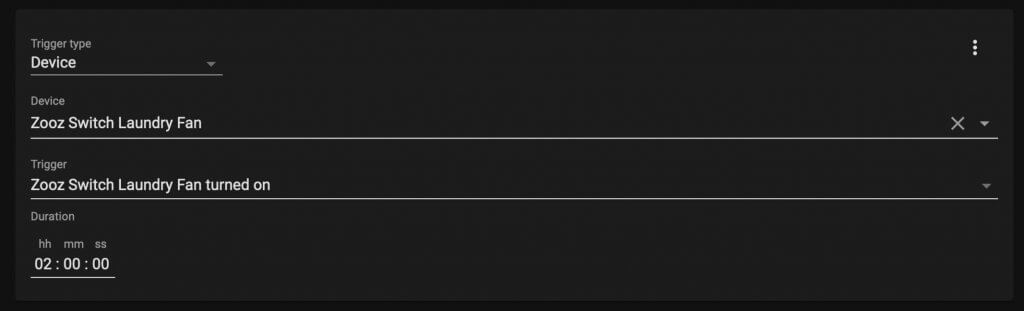
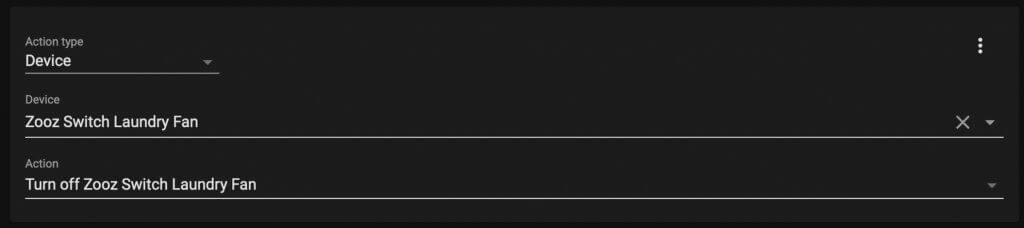
The other automation turns off the smart switch if it’s been running for 2 hours. That way it never gets left on too long.
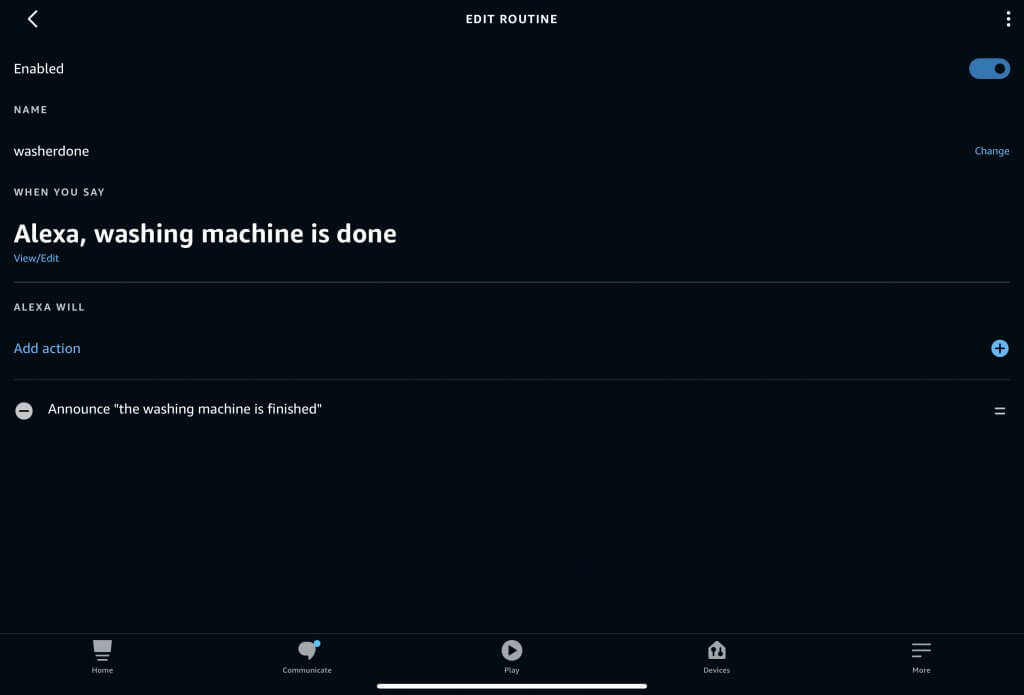
Laundry Announcement
To get an announcement on the Echo devices when the washing machine is finished and the dryer hasn’t started requires things from all the previous automations combined.
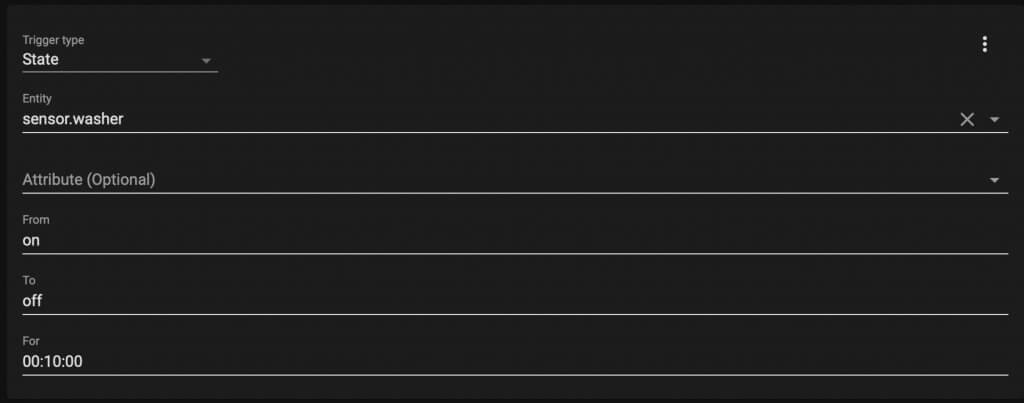
The trigger for the automation is when the washing machine has been finished for 10 minutes. Again I’m using this integration for my LG ThinQ washer and dryer. I installed it using HACS. Refer to the previous automation if you don’t have a smart washer/dryer.
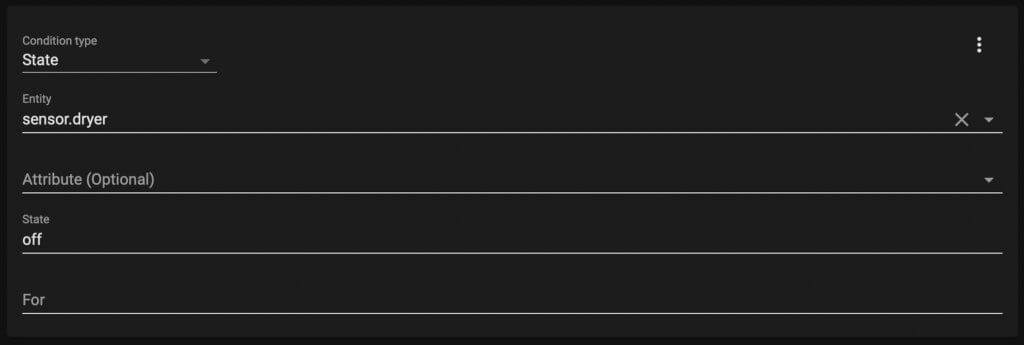
Then the condition for the automation is if the dryer is still off.
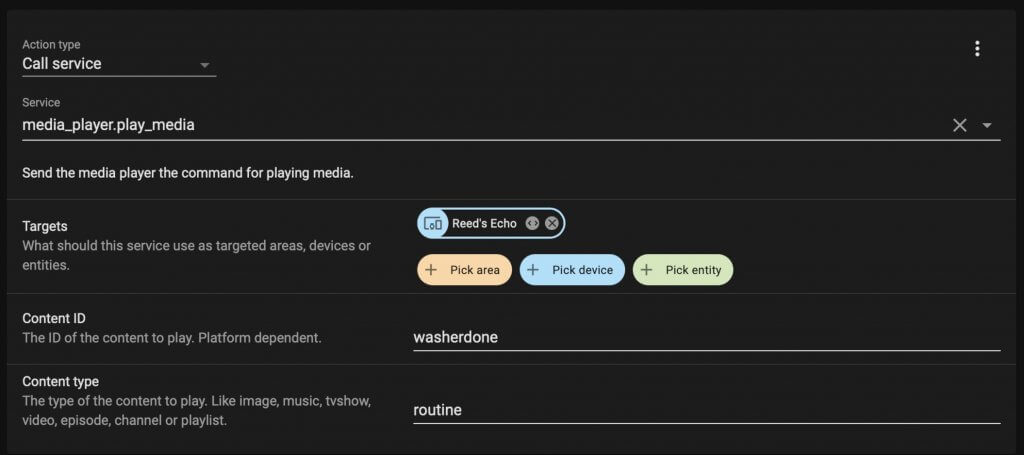
If so, call an Alexa Routine to announce it on the Echos. I’m using Alexa Media Player for this installed with HACS. It makes it really easy to call an Alexa Routine.
Fade Lights Based on Time
When turning lights on and off it’s much better to fade them. It gives you time to know the motion sensor is turning off the light, plus it’s less harsh when turning them on. Also, I’m using Lutron Caseta smart switches with dimmable LED bulbs for most of my smart lights.
There might be other ways to do this in Home Assistant, but the way I have mine set up is through different scripts on the lights I want to fade on and off. Here is an example of the lights fading on.
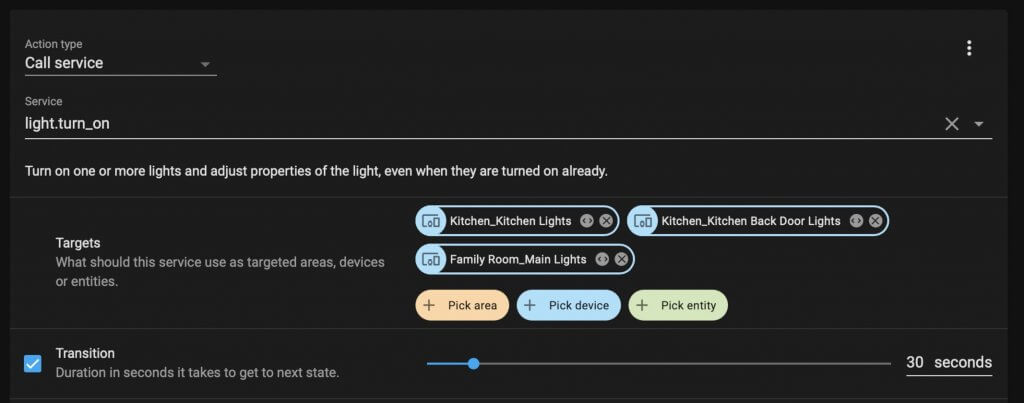
If you want to change the brightness it defaults to, just adjust the Brightness section down below.

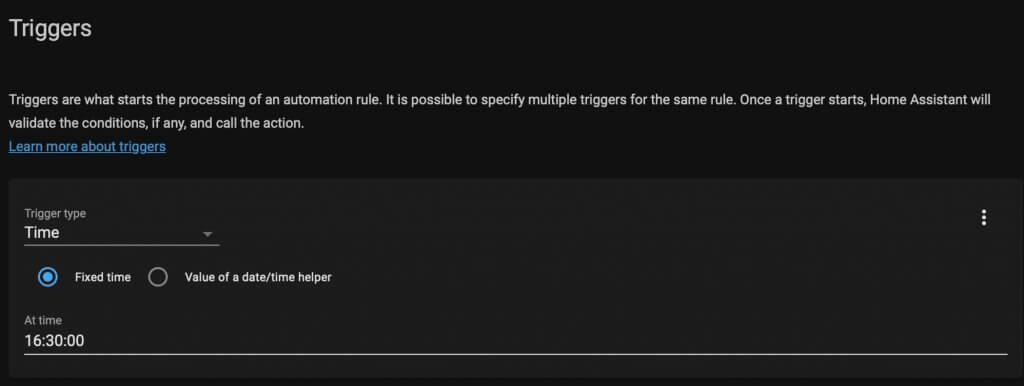
Here is an example of the lights fading off.
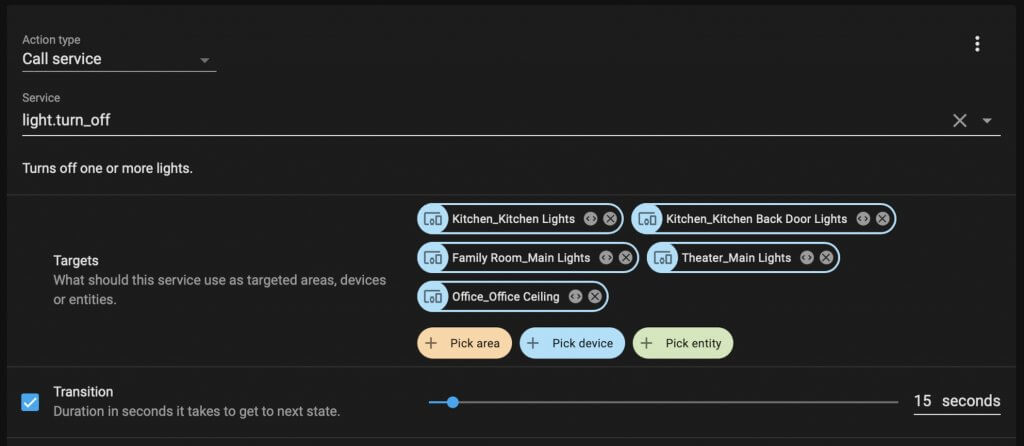
Then from the automation, just call the script to turn the lights on and off. I just have mine turn on every day at 4:30 right before dinner.

Motion Lights
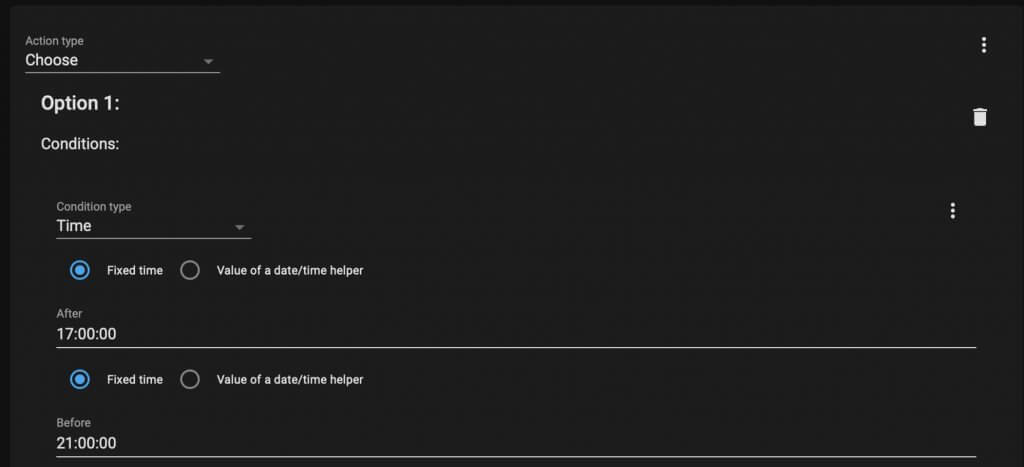
For the office I have multiple conditions in the Actions section of the automation. That way it’s one automation that gets called when there’s motion in the office. But depending on what time of day it is, the brightness will be set differently. Use the “Choose” option in the action for this.
alias: Office Motion Lights
description: ''
trigger:
  - type: motion
    platform: device
    device_id: abcdefghijklmnopqrstuvwxyz
    entity_id: binary_sensor.hue_motion_sensor_motion
    domain: binary_sensor
condition:
  - condition: device
    type: is_off
    device_id: abcdefghijklmnopqrstuvwxyz
    entity_id: light.office_office_ceiling
    domain: light
    for:
      hours: 0
      minutes: 1
      seconds: 0
      milliseconds: 0
  - condition: device
    device_id: abcdefghijklmnopqrstuvwxyz
    domain: cover
    entity_id: cover.ikea_office_left_shade
    type: is_closed
  - condition: device
    device_id: abcdefghijklmnopqrstuvwxyz
    domain: cover
    entity_id: cover.ikea_office_right_shade
    type: is_closed
action:
  - choose:
      - conditions:
          - condition: time
            after: '17:00:00'
            before: '21:00:00'
        sequence:
          - type: turn_on
            device_id: abcdefghijklmnopqrstuvwxyz
            entity_id: light.office_office_ceiling
            domain: light
            brightness_pct: 60
      - conditions:
          - condition: time
            after: '21:00:00'
            before: '06:00:00'
        sequence:
          - type: turn_on
            device_id: abcdefghijklmnopqrstuvwxyz
            entity_id: light.office_office_ceiling
            domain: light
            brightness_pct: 20
    default:
      - type: turn_on
        device_id: abcdefghijklmnopqrstuvwxyz
        entity_id: light.office_office_ceiling
        domain: light
        brightness_pct: 100
mode: single
Robot Vacuum
To get my robot vacuum cleaning once everyone has left the house required a few extra steps. One, my Roborock S6 Max V vacuum isn’t compatible with Home Assistant so I’m using Alexa.
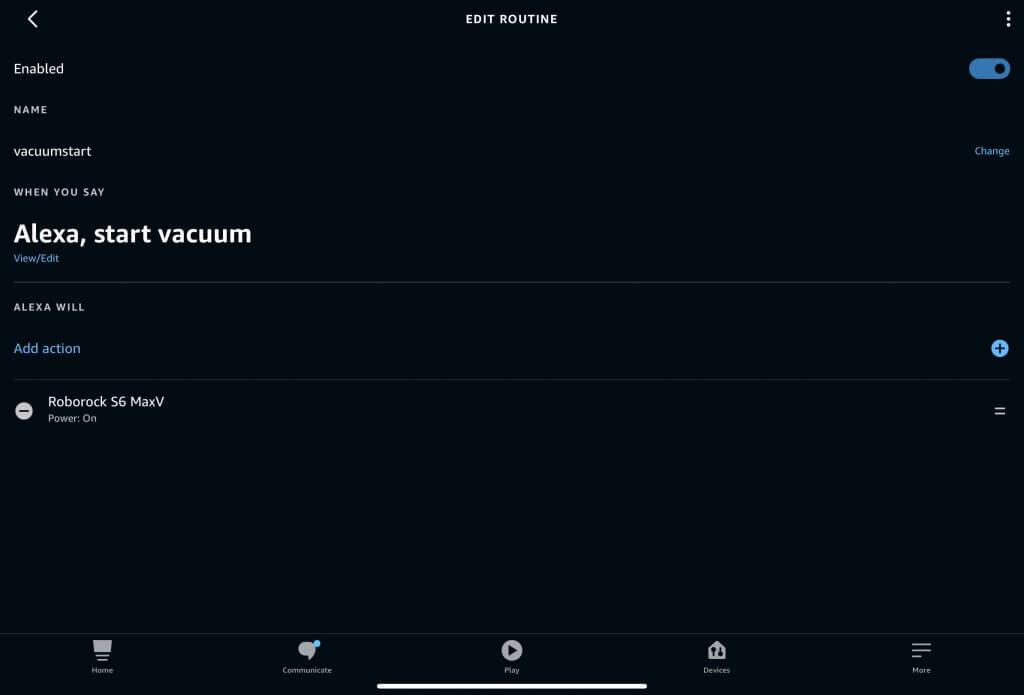
I’m using Alexa Media Player for this installed with HACS that triggers an Alexa Routine.
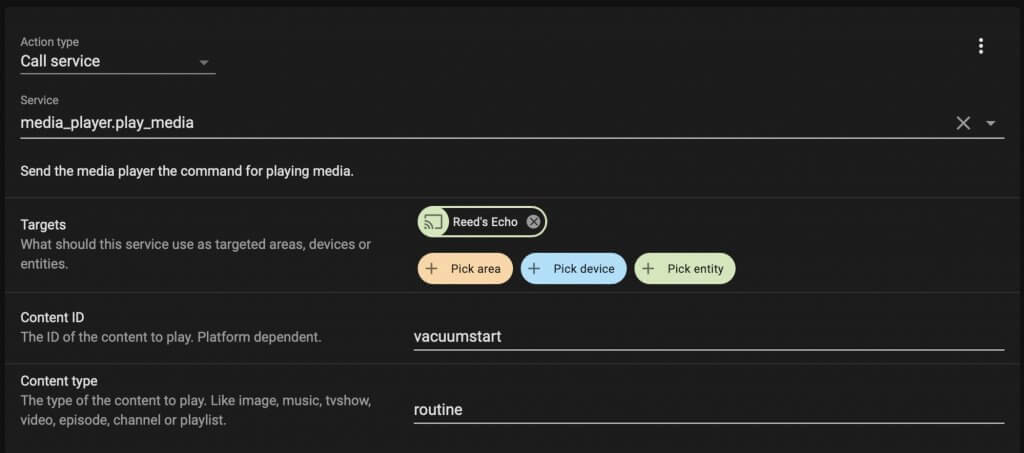
This Alexa Routine starts my robot vacuum.
I do the same thing for sending the robot vacuum back to the dock. Instead of turning it on with the Alexa Routine, just turn it off.
There are a few options you have to trigger an automation when everyone is away. You can use the geolocation from the app but this isn’t very accurate and reliable.
You can also use the Ping method. Reserve the IP address for your phones on your router and then use your phone connected to WiFi as the presence sensor. This works better than the geo location from the app, but it’s not 100% perfect. Sometimes phones will go into hibernate mode and disconnect from WiFi late at night so keep that in mind.
The best solution I found is integrating the router directly with Home Assistant. I am using Unifi and it connects directly. It pulls in all the devices connected to it, but I only use the phones to track my presence.
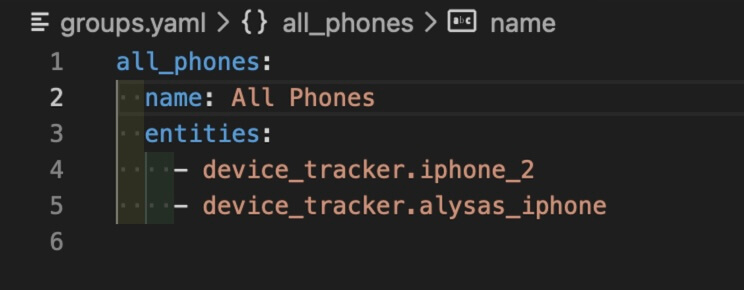
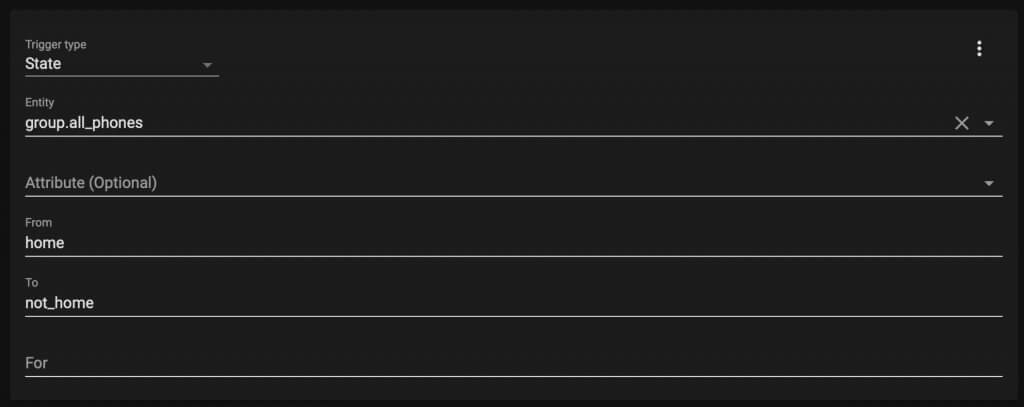
I created one more thing to make it work and that is a group. That will trigger the automation when both phones are away or if one phone comes back home.
To add a group, you only need to add a few lines to your configuration file. Here is a link with more info. And here is what mine looks like.
Then in the automation you can trigger it like this for when everyone is gone.
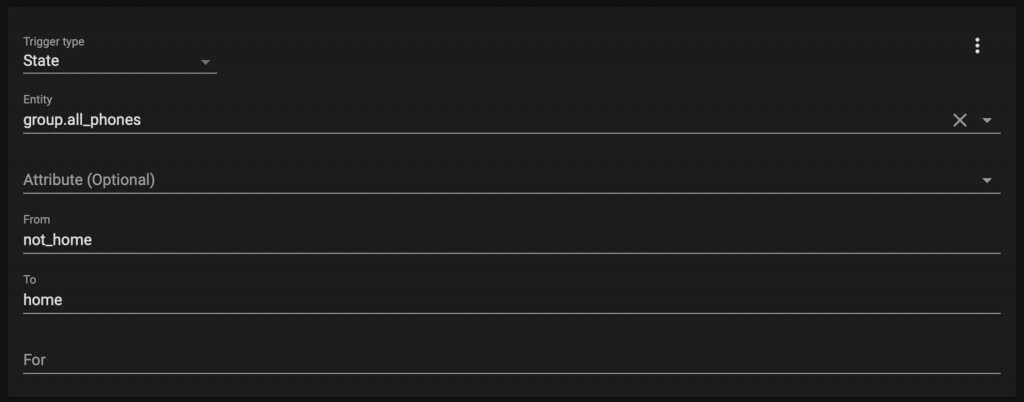
Or like this if someone arrives home.
Override Automations
If you want certain automations to not run, I would create virtual switches or boolean switches. In SmartThings I did a whole video about virtual switches.
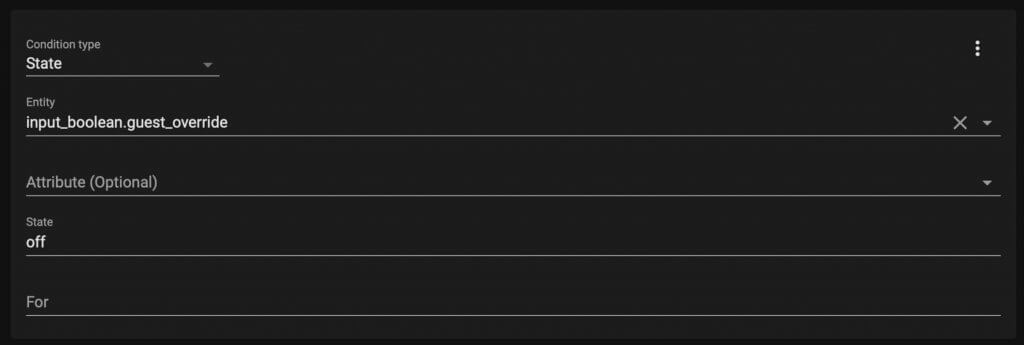
For Home Assistant, creating a boolean switch is kind of hidden. Click on Configuration -> Helpers -> ADD HELPER -> Toggle
Then if you don’t want to run the automation just add another condition to say if the boolean/switch is off, then run the automation. That way if the switch is on it won’t run it.
You can just toggle these on and off in the dashboard, but if you want to connect it to a button you can as well. I connected mine to an IKEA dimmer button. I had the most difficult time trying to connect it with a Zigbee stick so I ended up using SmartThings. I thought I couldn’t get a button connected in SmartThings to work with Home Assistant but I was wrong. Brett White showed me how to do it so thank you Brett!
In Home Assistant, go to the Developer Tools and click on the EVENTS tab up at the top. In the “Listen to events” section down below type in “smartthings.button” and click on START LISTENING. Then press the IKEA button and you will see some code pop up. You will need 5 values from there that you can find here in the documentation.
Then in the automation, the Trigger is an Event with those 5 values. This is what mine looks like.

Then for the Action it calls a service to turn the input boolean on. I also made my Echo say a phrase to know it worked.
Fine Turning & Debugging
When I’m creating automations I want to make sure they are running correctly. Normally if you are programming you create a dev environment and test there. You would never test on a production environment, but unfortunately that’s not the case with home automation. Sorry family for always testing in production.
Create push notifications to your phone when an automation is running. You don’t have to enable it all the time, but maybe for the first day or two it could be good to make sure the automation isn’t getting triggered when it shouldn’t.
If you are using webCoRE in SmartThings or Home Assistant there are logs you can look at. That way you can quickly go back and see why something didn’t run like you thought it should.
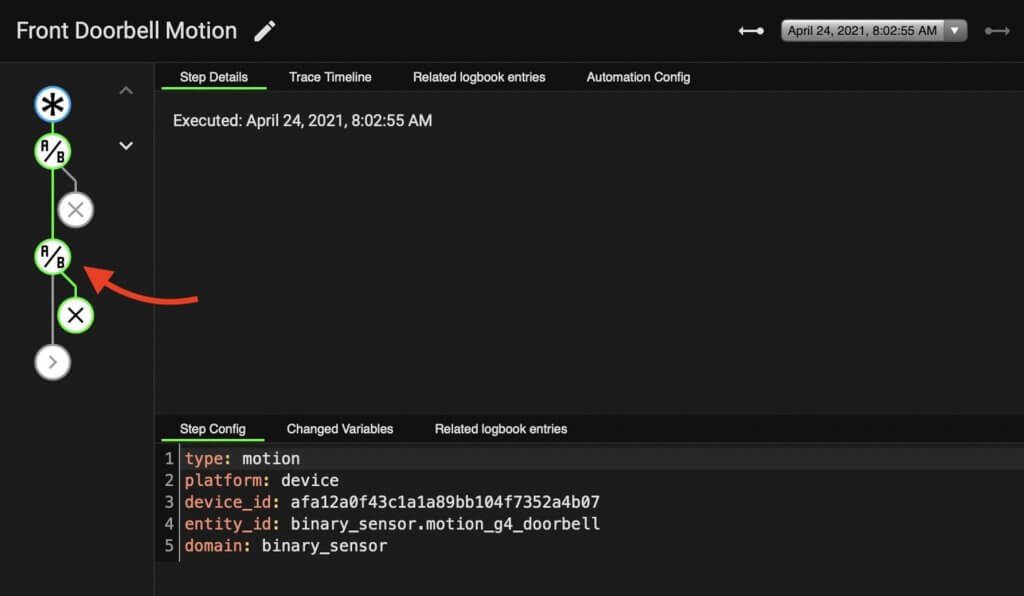
In Home Assistant there is this this Trace button you can click on for the automation.

It’s been a really helpful tool because I can see what conditions it passed and failed on. Then I can quickly verify that the automation is working as expected. If it isn’t, then what condition needs to be modified.
Thanks for taking a look at my automations and hopefully this was helpful! As I set up more automations in my smart home, there will definitely be more content like this. Make sure you subscribe here if you haven’t already.
Thank you Reed for taking the time to write this long post, it’s very inspiring !
Hello Reed, awesome video, it was really clear how you’ve described all the automations. Really enjoyed the sketches in with your family.
I do think though that the template conditions for the smart shades and smart doorbell automations could be made a bit simpler / ‘smarter’. You could accomplish that by using the state string instead of the object in the template, that’s also what’s advised in the Home Assistant docs. https://www.home-assistant.io/docs/configuration/templating/#states.
The way that your templates could look like for the smart doorbell and shades is this I think: https://gist.github.com/DutchDeffy/90563d47a3f8a2823e76a99aeefa7820
Correct me if I wrong tho.
Btw, something which might be interested and useful for this type of condition is the date and time formatting with strftime. eg. {{ now().strftime(‘%x’)}} prints the current date in ‘locale’s appropriate representation.’ https://www.programiz.com/python-programming/datetime/strftime