Thanks for checking out my video and now I’m going to explain how you can set these automations up yourself.
Most of these will be using Home Assistant, but I’ve also shown how to do many of these in SmartThings in previous videos and articles. I’ll try to link to those if applicable. Plus I’ll explain the logic of the automation so you can recreate it in whatever system you’re using.
Also, I’m not a Home Assistant expert, but I’ll try and keep it as simple as possible. If you are just getting started with Home Assistant, this will hopefully be helpful to you.
This article is in the same order as the video, and I sectioned off the instructions so it’s easy to jump to the automation that interests you.
Table of Contents
Next Level Automations: How To
Affiliate Disclosure: This page has affiliate links, which earn us commission at no cost to you.
Calendar Alarm
This is probably my favorite automation out of the group because it opens the door to so many more things you can do with it.
Here is the link for instructions to connect your Google Calendar to Home Assistant.
Once you get it implemented, it will create a /config/google_calendars.yaml file.
It was a little confusing at first, but basically it creates an on/off switch for each calendar that you can use in your automations. You can turn off the calendars you aren’t using and create more on/off switches for different types of events in one calendar.
I wanted to create a reoccurring event that would be my wake up time. If you want to wake up before a certain event then check out “offset” in that link.
I added this to my google_calendars.yaml file under my main calendar I use. This creates another on/off sensor to Home Assistant.
  - device_id: wakeup
    name: Wake up calendar
    track: true
    search: "wakeup"
That will look for any calendar event with the word “wakeup” and will turn the binary sensor “on” during the event.
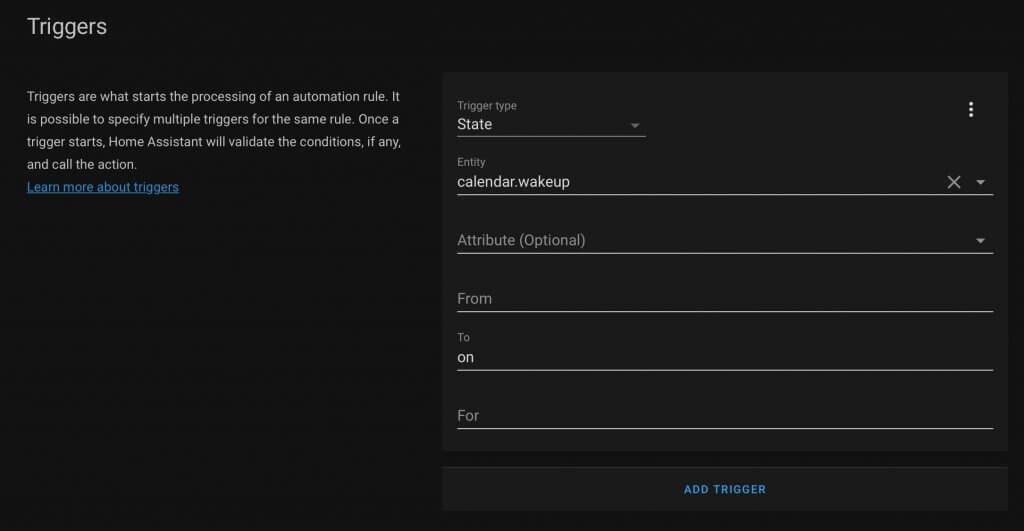
So the automation will look something like this.
Once this is all set up, it’s very easy to adjust since it’s all done from the calendar.
Wake Up Automation
The main thing I’m using for this is the Withings Sleep Sensor. It works with IFTTT and Home Assistant. I did have it connected to SmartThings using IFTTT to toggle a Virtual Switch on and off.
Here is the yaml code for the Home Assistant automation.
alias: Morning Wake Up Music
description: ''
trigger:
  - platform: state
    entity_id: calendar.wakeup
    to: 'on'
condition:
  - condition: state
    entity_id: binary_sensor.withings_in_bed_reeds_bed
    state: 'on'
action:
  - service: media_player.volume_set
    data:
      volume_level: '0.10'
    entity_id: media_player.echo_dot_master_bedroom
  - service: script.play_music_master_bedroom
    data: {}
  - delay: '00:01:00'
  - service: media_player.volume_set
    data:
      volume_level: '0.20'
    entity_id: media_player.echo_dot_master_bedroom
  - delay: '00:05:00'
  - condition: state
    entity_id: binary_sensor.withings_in_bed_reeds_bed
    state: 'on'
  - service: script.alexa_speak_wake_up
    data: {}
mode: single
If you want to have Alexa connected to Home Assistant, I explain how to get that set up at the bottom of this article.
If you want to trigger an Alexa routine from SmartThings, here is how I’ve set mine up.
Barking Automation
This can be done with either SmartThings or Home Assistant if you have an Echo device.
Technically you could create this using just an Alexa Routine, but you wouldn’t be able to only have it run when everyone is gone, so it’s probably not recommended to set up that way.
Using Home Assistant, connect Alexa using Alexa Media Player as mentioned here. Then reference this as the potential sound effects you can play through the Echo speaker.
I’m using Ping as my presence sensor to know if my wife and I are home. I set a static IP address for my phone and my wife’s.
Then I added this extra code to my configuration.yaml file.
device_tracker:
  - platform: ping
    interval_seconds: 30
    consider_home: 1200
    hosts:
      reed_iphone_ping: 192.168.X.XXX
      aly_iphone_ping: 192.168.X.XXX
It makes two devices reed_iphone_ping and aly_iphone_ping that will mark away from the house after 20 minutes of being disconnected. That will give it some buffer in case it randomly disconnects.
As mentioned in the video, phones will sometimes disable WiFi late at night temporarily, so keep that in mind when setting up the automation.
alias: Doorbell Motion While Away
description: ''
trigger:
  - type: motion
    platform: device
    device_id: 305946373e8311eb9ef8fb058ac97486
    entity_id: binary_sensor.front_door_motion
    domain: binary_sensor
condition:
  - condition: state
    entity_id: device_tracker.reed_iphone_ping
    state: away
  - condition: state
    entity_id: device_tracker.aly_iphone_ping
    state: away
  - condition: time
    after: '08:00:00'
    before: '22:00:00'
action:
  - service: script.alexa_sound_effect_echo_away
    data: {}
mode: single
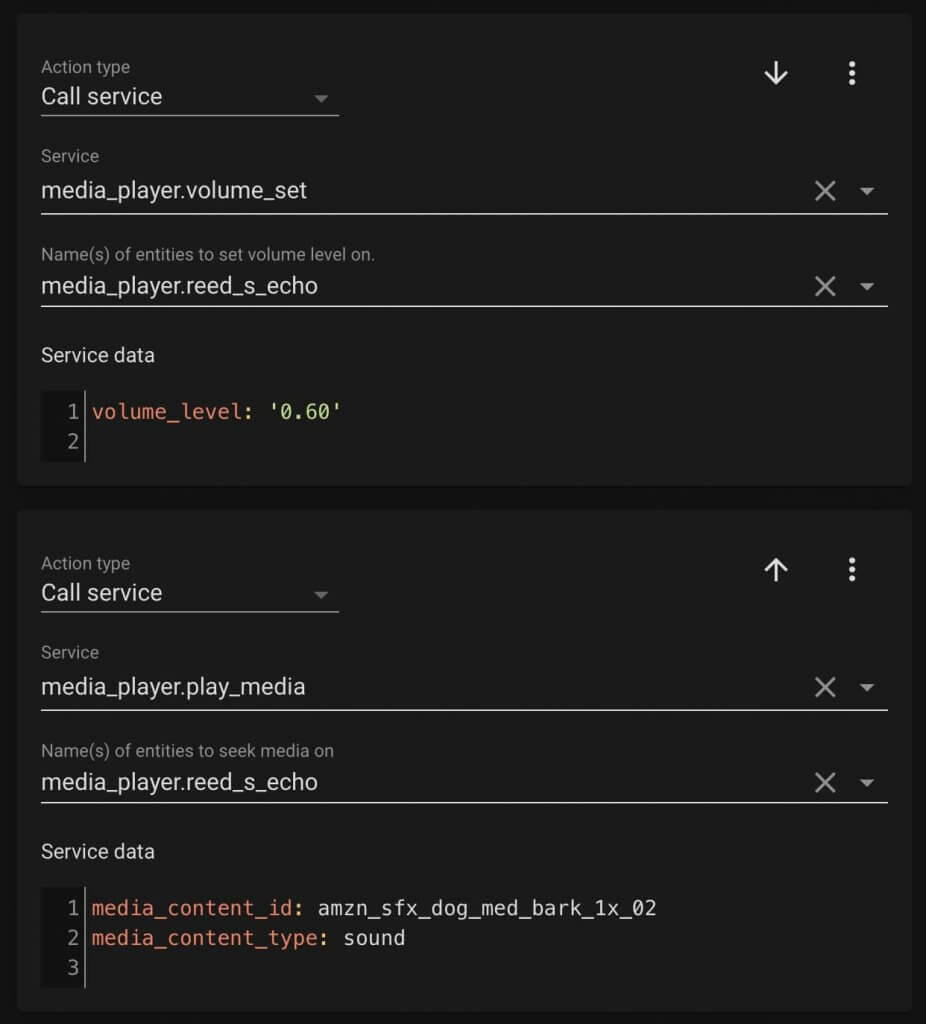
This automation calls a script in Home Assistant to play the sound effect. Here is the yaml to that script.
alias: Alexa Sound Effect Echo Away
sequence:
  - service: media_player.volume_set
    data:
      volume_level: '0.60'
    entity_id: media_player.reed_s_echo
  - service: media_player.play_media
    data:
      media_content_id: amzn_sfx_dog_med_bark_1x_02
      media_content_type: sound
    entity_id: media_player.reed_s_echo
mode: single
Also here is the same thing in UI form if that’s more helpful.
Music Room to Room
Since I listen to Spotify, I am using the Home Assistant Spotify integration. The automation gets triggered by a motion sensor in the room and then checks if Spotify is playing anything.
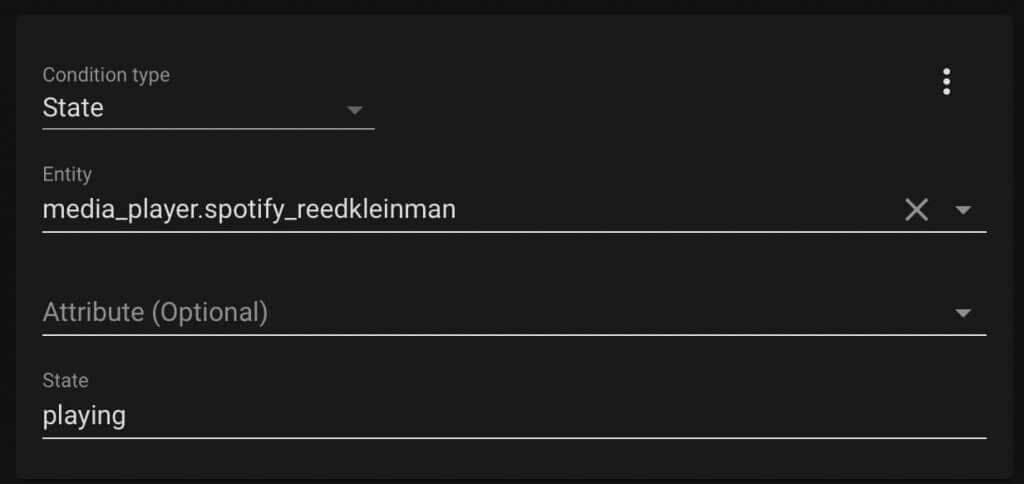
If Spotify is playing, then it calls a script that changes the speaker.
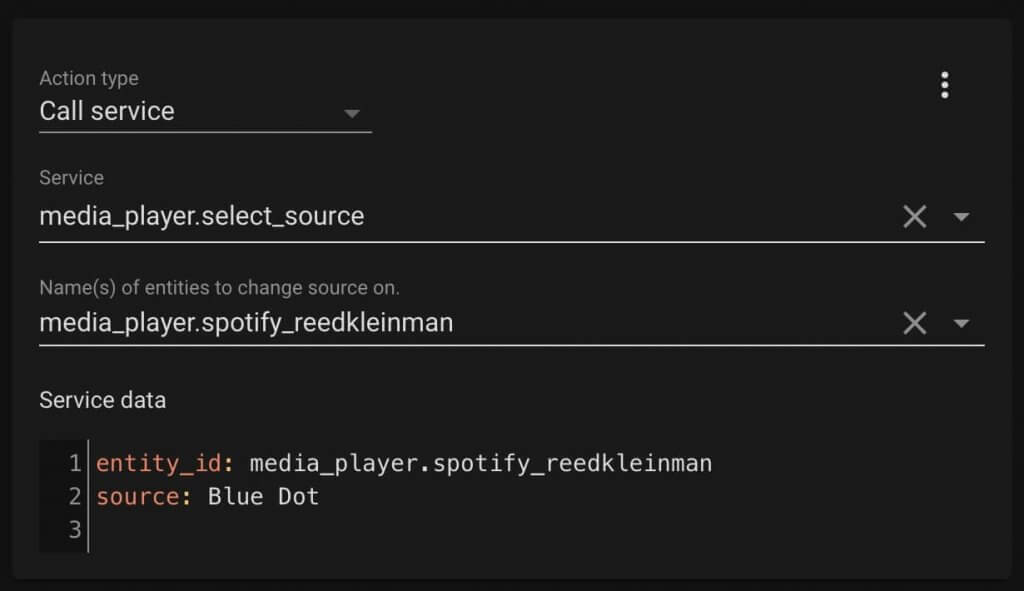
Where “Blue Dot” is the name of my Echo Dot. You can get the name of your devices by going to the Developer Tools in Home Assistant and searching for it.
This automation also uses our phones as presence sensors connected to WiFi. Reference the automation above on how I set that up.
Automated Lights
Lately my favorite motion sensor is from Hue. The batteries last FOREVER! Seriously it can easily last 2 or 3 years on the two AAA batteries inside.
I also like that it has both a light sensor and temperature sensor that Home Assistant has access to.
If you are using SmartThings, here is a previous article where I show an example of how to set this up.
For Home Assistant, this is part of the automation when it’s not very bright in the room and there’s motion, the lights turn on.
Dinner Automation
The NFC tag I am using is this one you can get on Amazon. At the time of writing this, those were unavailable so I also use these NFC tags as well.
I made a video on NFC tags that you can check out. I show how to trigger automations using SmartThings, HomeKit, and Home Assistant.
The way I have it set up is my iPhone uses a Shortcuts automation to call an Event in the Home Assistant app.
That Event triggers an automation in Home Assistant that calls this script to set the volume of the Echo device and play Spotify.
Here is the automation yaml.
alias: Kitchen Charger Tag
description: ''
trigger:
  - platform: event
    event_data: {}
    event_type: kitchen_charger_tag
condition: []
action:
  - service: script.play_music_spotify_living_room
    data: {}
mode: single
Here is a screen shot of the script UI.

TV Automations
One of the best ways to know if the TV is on or off is by using a smart plug that measures energy usage. I’m using the SmartThings WiFi smart plug connected with SmartThings.
I also have my SmartThings hub integrated with Home Assistant. If you want to just use SmartThings then check out number 20 of an article I posted showing how to do this in webCoRE.
You could also follow the same logic below and use it with just the native SmartThings automations. Just create a Virtual Switch instead of an input boolean.
You will need to create an input boolean in Home Assistant to keep track of if the TV is on or off. If you don’t, then the “TV off automation” can run over and over again. That’s because the power consumption of a TV bounces around even while the TV is off.
To create an input boolean in Home Assistant, go to “Configuration” and then “Helpers.” In the bottom right, click on “Add Helper” and create a Toggle helper. This is like a Virtual Switch in SmartThings.
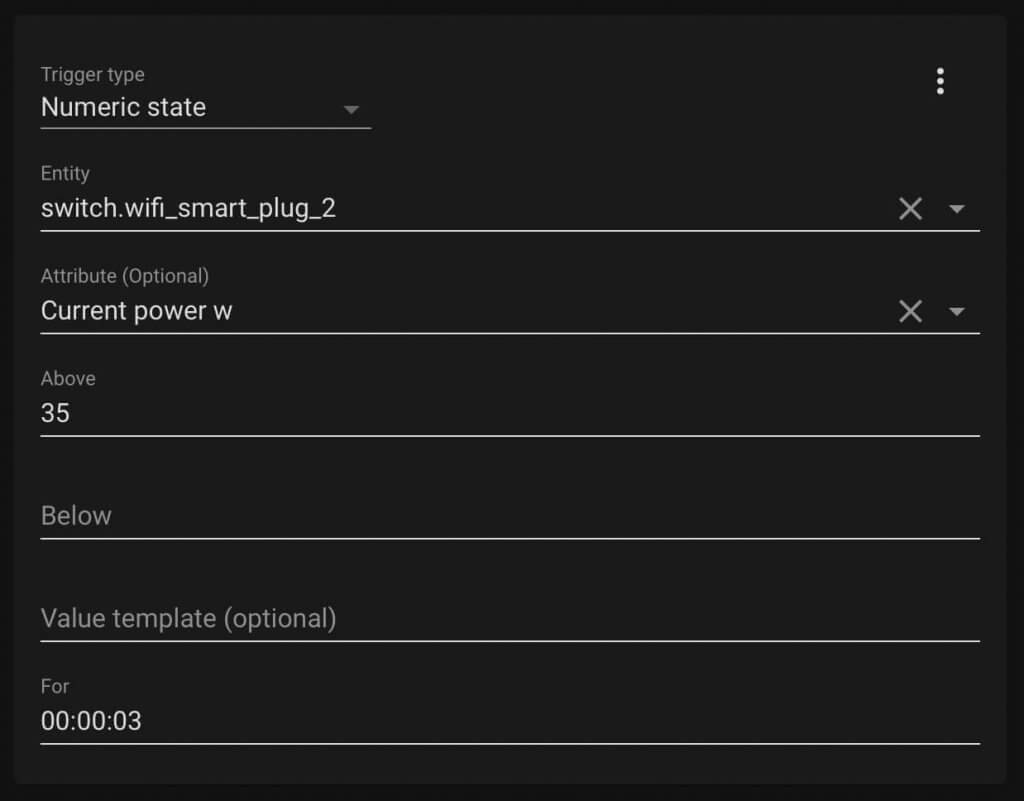
The trigger of the automation will be when the Watts go above a certain threshold for a few seconds. For my TV, 35 Watts was ideal, and over 3 seconds seemed to trigger the least amount of false positives.
Here is a screenshot of the automation’s trigger.
Also this is the yaml for the full automation.
alias: WiFi Plug On
description: ''
trigger:
  - platform: numeric_state
    entity_id: switch.wifi_smart_plug_2
    attribute: current_power_w
    for: '00:00:03'
    above: '35'
condition:
  - condition: state
    entity_id: input_boolean.tv_on
    state: 'off'
action:
  - service: scene.turn_on
    data: {}
    entity_id: scene.movie_lights
  - service: input_boolean.turn_on
    data: {}
    entity_id: input_boolean.tv_on
mode: single
Office Lights
When managing automations it’s much easier to create fewer, but more complicated automations, rather than a bunch of simple ones.
For example, I have my office lights change colors depending on the time of day. I could create two automations for different times, but that can get messy real fast.
Instead, create one automation for when motion is detected and have multiple IF ELSE conditions in the action.
To do this in Home Assistant, select “Choose” as the action type. The UI is pretty straight forward to select the nested Condition and Action.
Automated Doorbell
A feature that Amazon has added to their routines recently is the ability to write out custom commands for the action.
Scroll to the bottom and you will see the Custom option.
Routines can be called from Home Assistant, and this could take the automation a step further.
For example, if you were watching TV, you could have a routine called to display the live view of the doorbell on the TV instead of the Echo Show. This can easily be done using Alexa Media Player explained at the bottom of this article.
Bedtime Automations
This automation uses the Withings Sleep Sensor again. As mentioned above, it works well with Home Assistant and IFTTT. So if you are using SmartThings you could use IFTTT to integrate it.
The Withings Sleep Sensor is treated as an on/off binary sensor. Basically “on” is you’re in bed and “off” you are out of bed.
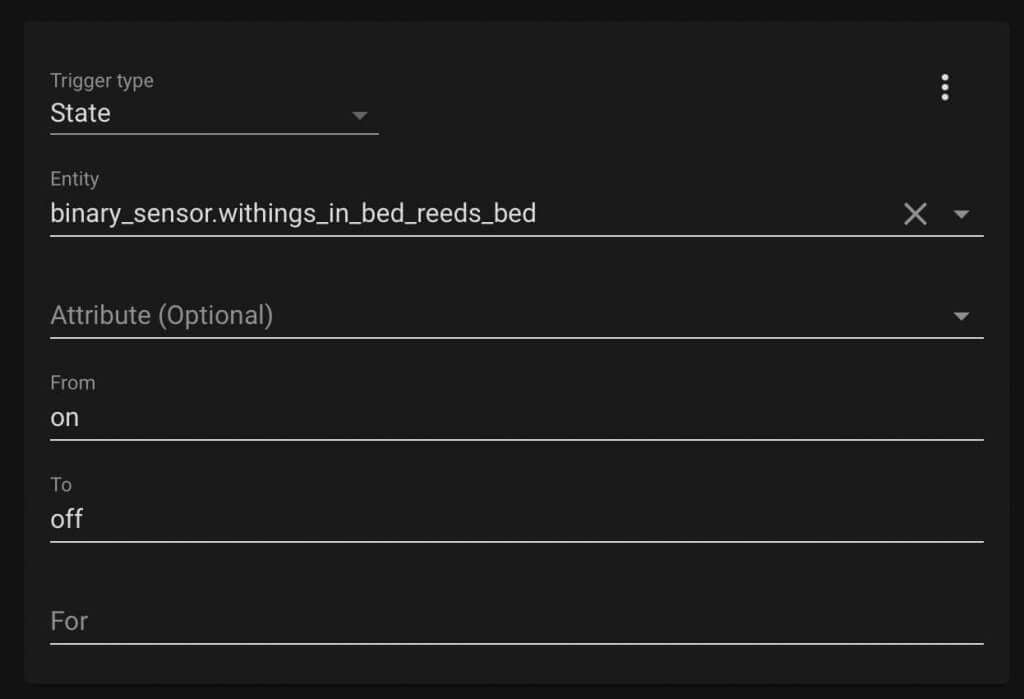
Use that as a Trigger for the automation for when you are getting in bed or out of bed. It’s not instantaneous in changing states, so keep that in mind. You may want a motion sensor near the ground to pick you up when you get out of bed. However, if you have pets then the Withings sensor might be a good option instead.
Connecting Alexa and Home Assistant
One of the easiest ways to get Alexa integrated with Home Assistant is using Alexa Media Player.
Here is a link to get it installed. HACS has had some vulnerabilities lately so be careful with that but the latest updates should have fixed everything.
With Alexa Media Player you can do so much with it. Call Alexa Routines, make Alexa speak phrases, play music, sound effects…etc. Here is a page of all the things you can do.
Hopefully this is helpful to those who are looking to take their smart home to the next level!
As I mentioned near the end of the video, I’ll also continue to cover more simple automations in Alexa and Google Routines, HomeKit, and of course SmartThings. Make sure to subscribe here so you don’t miss those.
Hey mate,
Love the show (channel). I have HA set up with media player, Im basically trying to kick off an Alexa routine from the Withings Sleep pad, but have no context for how to set that up, there is not much doco.
Can I get a some screen shots of your set up (if your doing routines) so I can get an idea of what goes where?
Thanks mate!
Appreciate it
Lot of good helpful information.
you are crazy, I like all the videos